Thursday, May 5, 2011

Allspice Oatmeal Cookies


Friends.... I am feeling a wee bit inflicted this past week.

There seems to be so much going on.

Tsunamis. Tornados in Alabama. Osama bin Laden dying. Friends betraying friends. New job offers. Crossroads in life...

And me getting a car.

Which isn't exactly inflicting to ME...moreso to the people who will be driving with me on the road.

I can just hear it now...

"Hey GRANDMA. GET OFF THE FREAKIN' ROAD. I have to be at work in 5 MINUTES. You're doing 20 IN A FAST LANE."

Yes... that's right. I'm a grandma driver. I do the speed limit. I check three times before I cross the street. You might as well throw a walker at me and call it a day, I'd probably get to work faster that way than driving.

But at least I have transportation!

Now I just need money.


In fact, having no money is kind of what brought me to this recipe to begin with. These cookies are very easy to make and you probably have all the ingredients sitting in the back of your cabinet somewhere collecting dust because that one reason you bought them you forgot to use them for and now it's too late because you already used the other ingredients and you're too lazy to go to the store and get them.

Yeah, that's right. I know your dirty kitchen secrets. Its okay. Mine are probably the same. If you must know, I bought the raisins and dried cherries in this for a chicken salad ( that I never made ) and the oats for breakfast (which I also never made due to my incompetence in making oatmeal).

So when I got the urge to make cookies, I immediately thought Oatmeal. Then I thought to use both the raisins and dried cherries and use them up (I didn't have enough in each packet to just use one flavor). And while I began to make the sweet doughy concoction, it occurred to me that while looking through my spice cabinet that I had no cinnamon whatsoever.

Then, I dropped dead of shock. Because this NEVER. HAPPENS.

I always have cinnamon around. Cinnamon is my mistress. My other lover. The boy next door. It's my favorite spice of all time. When I didn't see any in the cabinet I just about freaked out. Then I stuck my finger in the cookie dough and ate off a spoonfuls worth. Then I felt better.

I tried looking for the closest possible spice. Nutmeg? Oh god, no. Ever since that one time I tried to make Alfredo sauce by scratch and threw like 2 tablespoons of nutmeg in the sauce, nutmeg and I have never seen eye to eye. Cloves? WAY too strong and dark. Ginger? I just had a feeling that wouldn't bear well with the raisins and dried cherries. So, almost at the end of my rope, I kept looking until at the very back of the cabinet I saw my savior:

Allspice.

Allspice doesn't get much attention, but it should. It's a great substitute for cinnamon, since it basically carries all the spices in (cinnamon, nutmeg, cloves, etc) without being too overpowering. In fact, when I made this cookies I thought it tasted BETTER than cinnamon did. It just gave them this different, spicy edge to it that complimented the dried fruit PERFECTLY. I'm actually really excited about it, too, because who knows what else it's good with? dried apricots, maybe? allspice chocolate chip cookies? we shall see.

In the meantime though, if you're in a cookie crunch and you don't have all the ingredients you wish you did... make these. I'm sure if you don't have allspice you can sub out cinnamon, but it won't taste the same. This recipe is a good base recipe for any additions, really, so just use your imagination.

You may come up with one of your favorite cookies ever.

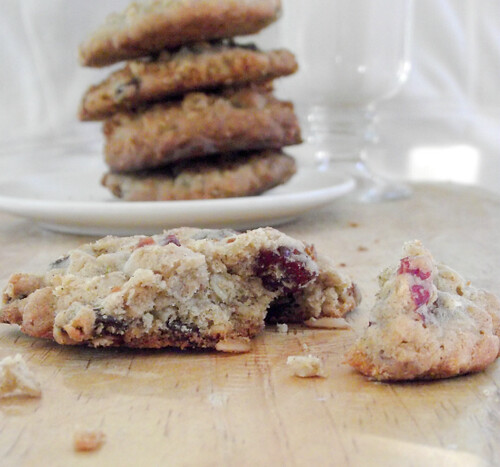
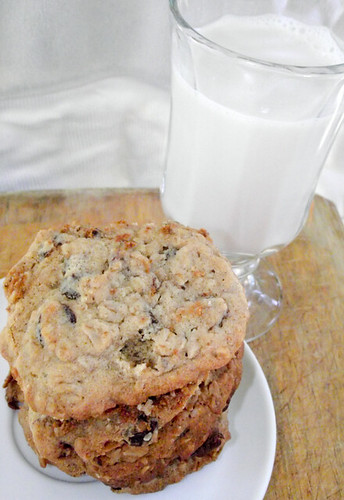
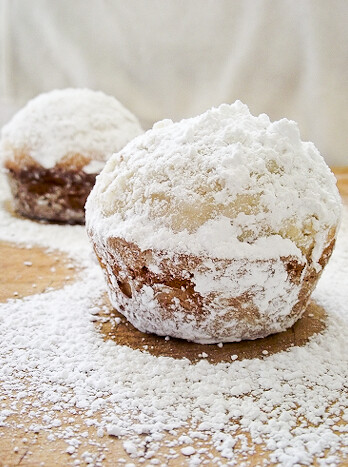
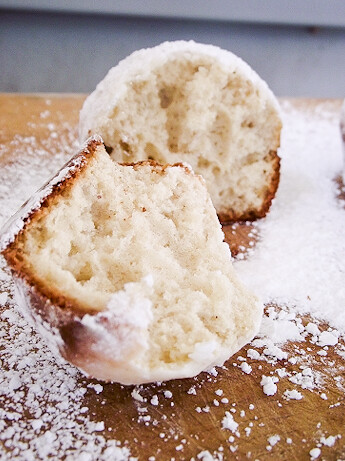
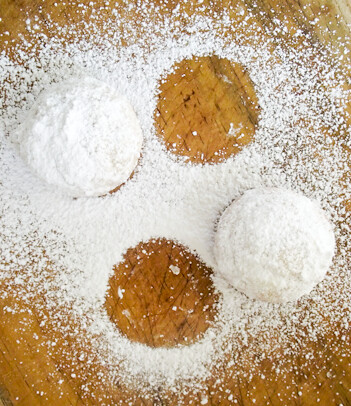
Allspice Oatmeal Cookies with Raisins and Dried Cherries

Ingredients:
1/2 cup butter, softened
3/4 cup brown sugar, packed
1 egg
1 teaspoon vanilla extract
1/2 cup all-purpose flour
3/4 cup whole wheat flour
1 1/4 teaspoon allspice
1 teaspoon baking soda
1/2 cup each raisins and dried cherries or other dried fruit of choice
1 3/4 cup rolled or quick cooking oats (not instant!)

Instructions:

1. Preheat oven to 350F. Prepare a cookie sheet pan.

2. Cream together the butter, brown sugar, egg and vanilla on low setting until smooth.

3. In a separate bowl, combine the flour, allspice, and baking soda. Add into butter mixture and mix until there are no traces of flour left.

4. Fold in dried fruit and oats by hand with a spatula.

5. Drop the cookies by tablespoonfuls (I made mine a bit bigger) about 2 inches away from eachother on the pan in case they spread (mine didn't). Bake for about 8-10 minutes, or until the cookies are done around the edges but still a little raw in the middle. Cool on pan for 2 minutes then move onto wire wrack to cool completely. Devour immediately.

Makes 1 1/2 dozen cookies depending on how big you make them.

Wednesday, April 20, 2011

Vanilla Cupcakes with Vanilla Bean Lemon Buttercream

Sometimes, I forget why I love baking.

I get so caught up in all the hustle and bustle of the day that I just...forget. I forget what butter and sugar look like mixed together. I forget what it's like to feel dough kneaded between my fingers. I forget what it's like to spread homemade icing on a cake, or pressing down buttery delicious graham cracker crumbs into a springform pan. I forget the heat of the oven, the smell of freshly baked cinnamon apple muffins, the first bite into a homemade cookie...

I forget all of the things that are so important to me. That keep me calm, balanced, and happy.

Baking has always been my get-away vacation from the norm. It's time I spend alone in a kitchen with nothing but frantic ideas. It's relaxing, for the most part. And even when it's not -- even when you take a task on so great that you end up curled into a ball on the kitchen floor with icing in your hair and a mess on the counters... you still feel like you conquered the world once that awesome dessert you spent 5 hours to perfect is on your table ready to be served, its demanding presence drawing everyone in.

They ooh, and ahh, and smile, and become happy with each bite. Therefore, making you happy in the process. Because not only did you totally kick that recipes BUTT, but you made people smile and forget their problems.

Baking is a gift. And I need to find more time in my life to do it.

That's why I forced myself in the kitchen yesterday. Though I dreaded the pile of dishes that would follow, I proceeded with confidence. I thought up a recipe. I mixed it all together. I baked them at 350F. And then I frosted them.

Thus, the birth of Vanilla Cupcakes with Vanilla Bean Lemon Buttercream.

And despite the natural light outside not doing well for my little starter DSLR, I went ahead and posted anyway.

'Cause honestly? These cupcakes could make anyones day ten times better.

I've never actually used real vanilla bean in a recipe before, so I was excited when I did for this one. I practically jumped around the room, showing everyone my vanilla bean.

I must've sounded like some kind of Ina Garten obsessed freakshow.

"Look! LOOK! It's a VANILLA BEAN. A REAL VANILLA BEAN! Oh my God. It's the pod and everything! Holy crap! I've only seen this on the teevee!"

Sadly, no one seemed as enthralled by it as I was.

Whatever. Don't judge me.

Anyway, I'm glad I mixed this into the buttercream. It added a fantastic vanilla flavor that I just loved. I used just a little bit of lemon, not enough to overpower it. I didn't want to get rid of that vanilla bean flavor. But you can definitely taste undertones of it. And when your teeth hit the perfect, fluffy vanilla cupcake underneath, you will be in spring HEAVEN.

It's really great to make for any spring-time get together, for church or just for friends coming over for a bit. I highly recommend eating it outside with a pitcher of lemonade while it's nice and sunny...preferably by a pool :) (If you don't have a pool, that's ok -- i'm sure those weird neighbors across the street wont mind you using theirs.)


Vanilla Cupcakes with Vanilla Bean Lemon Buttercream

INGREDIENTS:

Vanilla Cupcakes
1 1/2 cups all-purpose flour
1 cup sugar
1 1/2 teaspoon baking powder
1 stick butter (8tbsp), room temperature (VERY important!)
1 egg
2 egg yolks
1/2 cup sour cream or full-fat yogurt
1 1/2 tsp vanilla extract

Vanilla Bean Lemon Buttercream
1 vanilla bean
1 large lemon (or 2 small)
1 tbsp vanilla extract
2 sticks butter (16tbsp), room temperature
3-4 cups powdered sugar

INSTRUCTIONS:

1. Preheat oven to 350F. Place cupcake liners in a 12pc cupcake pan or spray with nonstick spray or bakers spray.

2. In an electric mixer with a paddle attachment (or hand mixer), combine the flour, sugar and baking powder together. Add in the butter, eggs, vanilla, and sour cream/yogurt, and mix for 30 seconds (or 1 minute for hand mixer) until the dough is smooth with no clumps, making sure to scrape down the sides.

3. Disperse batter evenly into cupcake pan. Place in the oven and bake for 20-25 minutes or until tops are pale golden and a toothpick through the middle cupcake comes out clean. Once done, leave to cool on a wire wrack.

4. Meanwhile, make the frosting. To a bowl, add the butter, vanilla extract, the zest of 1 large lemon, and the juice of the same lemon. Mix together briefly to combine. Using a sharp knife, cut down the middle of the vanilla bean and scrape the beans inside out and into the mixing bowl. Mix again until the beans are incorporated into the butter. Add 3-4 cups gradually to the bowl until your frosting has the consistency you like, checking for taste after each addition (make sure it's not TOO sweet!)

5. Once cupcakes are cooled COMPLETELY, frost cupcakes as you desire (I just swirled them on with a knife... I'm simple.)

Monday, April 4, 2011

Cinnamon Rolls


Before I talk about these beautiful, delicious rolls of love... let me tell you 5 reasons why these should not invoke any guilty conscious in you when you make them (and eat all of them).

1. Cinnamon. Cinnamon is good for you. It's high in antioxidants, helps digestion, and also lowers stress!

2. Has enough carbohydrates to make you want to wrestle a bear. And really, hasn't everyone always wanted to wrestle a bear before?

3. You actually can tell people what ingredients go in them! Bet you can't do that with your regular old supermarket cinnamon rolls.

4. They give you a work-out! Rollin' the dough out for these babies is like running a marathon. You'll have so much arm muscle after this you'll be able to lift up a car! (disclaimer: please do not actually attempt said statement after eating cinnamon rolls as it may cause hip displacement or other injuries to vital areas)

5. It makes 7 pans. 7. Pans. What are you going to do with 7 pans of cinnamon rolls?! You practically have to give them away! This recipe actually ENCOURAGES will-power, selflessness, and kindness to your neighbors! (even if you're still pissed at them for stealing your mail for a year)

Now that we've gotten that over with, we can continue with how amazing these cinnamon rolls are. They will make men propose to you. Make your manager give you a raise. They'll make you the most popular chick (or guy) around. Soon enough, people will be begging you to make more. In fact, they'll demand it. They are that good.

Just don't tell anyone it has four and a half sticks of butter in it. Especially not Jillian Michaels. She might come to my house and make me do burpies.

I hate burpies.

Really, though, if you want to make a special treat... This is it. This recipe makes A LOT of cinnamon rolls... so if you make the full recipe, be prepared to give some away. I gave two batches to my neighbor, three to my work (they were gone two days), and froze the last two. They are better than any cinnamon rolls you'll buy from a bakey. And people will be super impressed when you tell them you made them yourself. I highly recommend starting the night before and finishing it in the morning. You can easily freeze these like I did after their done baking or before you put them in the oven. Either way, people will be singing your praises.

Just make sure you save one for yourself.
Remember: Cinnamon rolls make your digestion better.

And who doesn't like being regular?

Right?
...Right?

...

*cricket*


Better Than Supermarket Cinnamon Rolls with Maple Frosting

INGREDIENTS


Rolls:
1 quart whole milk
1 cup vegetable oil
1 cup sugar
2 packages active dry yeast (o.25 oz packets)
8 cups (plus 1 cup flour, separated) all-purpose flour
1 teaspoon (heaping) baking powder
1 teaspoon (scant) baking soda
2 cups butter (4 sticks butter), melted
2 cups sugar
Generous amount of ground cinnamon


Maple Frosting

2lbs powdered sugar (1 large bag)
1/4 cup real maple syrup
1/2 cup milk
1/4 cup melted butter
1/4 cup brewed coffee
1/8tsp salt

INSTRUCTIONS

1. Mix the milk, vegetable oil and sugar in a pan. Scald the mixture (heat until just before the boiling point). Turn off heat and leave to cool 45 minutes to 1 hour. When the mixture is lukewarm to warm, but NOT hot, sprinkle in both packages of Active Dry Yeast. Let this sit for a minute. Then add 8 cups of all-purpose flour. Stir mixture together. Cover and let rise for at least an hour.

2. After rising for at least an hour, add 1 more cup of flour, the baking powder, baking soda and salt. Stir mixture together. (At this point, you could cover the dough and put it in the fridge until you need it – overnight or even a day or two, if necessary. Just keep your eye on it and if it starts to overflow out of the pan, just punch it down).

3. When ready to prepare rolls: Sprinkle rolling surface generously with flour. Take half the dough and form a rough rectangle. Then roll the dough thin, maintaining a general rectangular shape. Drizzle 1/2 to 1 cup melted butter over the dough. Now sprinkle 1 cup of sugar over the butter followed by a generous sprinkling of cinnamon.

4. Now, starting at the opposite end, begin rolling the dough in a neat line toward you. Keep the roll relatively tight as you go. Next, pinch the seam of the roll to seal it.

5. Spread 1 tablespoon of melted butter in a seven inch round foil cake or pie pan. Then begin cutting the rolls approximately ¾ to 1 inch thick and laying them in the buttered pans.

6. Repeat this process with the other half of the dough. Let the rolls rise for 20 to 30 minutes, then bake at 400 degrees (see note below) until light golden brown, about 15 to 18 minutes.

For the frosting, mix together all ingredients listed and stir well until smooth. It should be thick but pourable. Taste and adjust as needed. Generously drizzle over the warm rolls. Go crazy and don’t skimp on the frosting.

Saturday, March 26, 2011

New York Style Crumbcake


Every once in awhile, when my father wanted to treat us, he would drive us after church to a bakery called "Entenmans" off the side of the highway. I remember walking in and just looked at the boxes and boxes of pound cakes, chocolate donuts, cream cheese danishes and chocolate chip cookies. I would look through them excitedly, not straying far from my father. He would smile at me and say, "pick one thing you want", while picking out some things for himself and the rest of the family. My eyes would get wide with excitement, and I would stand there, stuck with a choice that as a child seemed so absolutely life-threatening. If I got the chocolate chip cookies, I wouldn't have any orange pound cake. But if I got the pound cake, then I wouldn't get any chocolate chip cookies. I remember always standing there anxiously, thinking hard.


But there was one item that they sold there that I was honestly addicted to. One of the best things I had ever eaten: New York Style Crumbcake. It had a brilliant small crumb on top, moist cake underneath and powdered sugar all around. If I ever came to a fork in the road about what I wanted, my hands immediately went for the crumb cake. I would constantly sneak into the kitchen, grabbing another slice, until my father would ask who was eating all of the crumb cake and I'd keep my mouth closed and grin to myself sheepishly.

Unfortunately the bakery near me closed down, and now we can only buy some in packages at the super market, which never tasted exactly like the ones that came from the place we went to. And no matter how hard I've tried, I've never been able to completely mimic the taste in a recipe. But I've come damn close with this cake. Infact, I am perfectly fine with settling for this if I cannot get the best, because aside from a bit of dryness at the cake part underneath, this crumb cake was 100% DELICIOUS. And if you are a fan of the crumb cake, then you will like this. I do recommend using something to keep the cake moister or richer... Maybe more butter, or perhaps sour cream in place of buttermilk. Either way, it's an awesome way to treat yourself or just eat something new. Just makes sure you poor some powdered sugar all over these... It's just not right without it.

New York-Style Crumb Cake
Adapted from America's Test Kitchen

INGREDIENTS:
For the crumb topping:
1/3 cup granulated sugar
1/3 cup dark brown sugar
1/8 teaspoon salt
3/4 teaspoon ground cinnamon
1/2 cup (1 stick) unsalted butter, melted, still warm
1 3/4 cups cake flour

For the cake:
1 1/4 cups cake flour
1/2 cup granulated sugar
1/4 teaspoon baking soda
1/4 teaspoon salt
6 tablespoons unsalted butter, at room temperature
1 large egg
1 large egg yolk
1 teaspoon pure vanilla extract
1/3 cup buttermilk, at room temperature

DIRECTION
Set an oven rack to the upper-middle position and preheat the oven to 325 degrees. Spray an 8-inch square baking dish with nonstick cooking spray and line it with a strip of parchment paper or aluminum foil that is just shy of the width of the dish and long enough to overhang the sides of the dish. Spray the parchment paper with nonstick spray as well.

In a medium bowl, stir together all the ingredients for the crumb topping until they form a smooth dough. Let the dough rest for 10 minutes while you prepare the cake.

In the bowl of an electric mixer, stir together the cake flour, sugar, baking soda and salt at low speed. With the mixer running on low, add the butter chunks one at a time, letting each one incorporate into the dry ingredients before adding another. When the mixture resembles even, moist crumbs, add the egg, egg yolk, vanilla and buttermilk, and increase the speed to medium. Beat until the batter is light and fluffy, about 2 minutes. Scrape the batter into the prepared pan.

Break apart the crumb topping into large pea-sized pieces, rolling them slightly in between your fingertips to get them to hold their shape. Spread the crumbs in even layer over the batter. Bake until the crumbs are golden and a cake tester inserted into the center of the cake comes out clean, 35 to 40 minutes. Cool on wire rack at least 30 minutes. Lift the cake out of the pan using the parchment handles. Dust with confectioners' sugar just before serving.

Friday, March 4, 2011

Dulce De Leches Cheesecake


For some reason, gossip never seems to go out of style no matter how old you are. You could be 40 years old and still stuck in a inferno of twisted stories. Sure, they may start off innocent. One person telling another person that they saw some hot golfer guy that lives down the street from them helping Crazy Old Lady Tooters with her groceries. Then the person you told says something about it to someone else, then that someone else says it to someone, and suddenly it turns into:

"Did you hear about what's going on with Crazy Old Lady Tooters that lives down the street?! I heard she's having an affair with the hot golfer guy that's married to that one chick that works at Kmart... I even heard that he got her pregnant! I know she's like 5038 years old but oh, my, GOD!"

Then someone decides it would be a good idea to actually ask the people in question what's going on instead of assuming something. Nine out of ten times they hear something completely different than what their peers said. What was thought to be an affair actually turns into Crazy Old Lady Tooters needing help putting away her groceries because she was too weak to put them up in her cabinets, and hot golfer guy was just being a good ol' gentlemen. No affair. No pregnancy. No bomb conspiracies. No wife who works at kmart being cheated on.

Rumors. They can get sticky pretty fast.


Unfortunately, no matter where you go in life, rumors will eventually find their way to you. I'm currently stuck in one that has been blown so much out of logic that at this point all I can do is laugh that anyone could even come up with stuff. It really is ridiculous. I like a good story now and then, but life isn't a Jerry Springer Show. When it comes to gossiping, I try to keep my mouth shut. I've always lived by the philosophy that whatever people tell me, I won't go blabbing to someone else unless I want to know the truth. And in that case, why not just ask that person straight up? This is one of my favorite bible verses concerning this:

“A gossip betrays a confidence, but a trustworthy man keeps a secret.” Proverbs 11:13

I try to live by this verse when it concerns gossip. Afterall, no one needs to know eachothers private lives.

Now, if you're going to spread rumors about me... At least have it to do something with my baking. Good rumors. Like, "hey, I heard Alex bakes a mean dulce de leches cheesecake"... that, I can live with. Totally. Absolutely. Go right ahead and say stuff about me if you're gonna be saying that.

While you're at it, mention that my dulce de leches has a spiced graham cracker and almond crust. And that it's got a sour-cream dulce de leches swirl on top. Tell them it's absolutely splendid, not too sweet not too bitter... A beautiful medium.

And tell them that I will totally make one for them, too.


Dulce De Leches Cheesecake

INGREDIENTS

Crust:
1 1/2 cup graham cracker crumbs (about 12 crackers)
3 tablespoons granulated sugar
6 tablespoons butter, melted and still warm (not scorching hot) to the touch
1 teaspoon cinnamon
1/2 teaspoon nutmeg
3/4 cups almonds


Cheesecake:
3 8oz packages of cream cheese, room temperature
1 cup granulated sugar
2 tablespoons flour
1 teaspoon vanilla extract
1 teaspoon almond extract (can replace with vanilla extract)
3 eggs, room temperature
1/2 cup homemade or store bought dulce de leches (from a 14 oz. can)

Topping:
2 cups full-fat sour cream
3 tablespoons granulated sugar (I added more sugar to this cause I like the topping more sweet, but add more to your own preference)
1/2 cup or whatever remains of the dulce de leches
1/4 cup slivered almonds (to decorate)


DIRECTIONS:


1. Preheat your oven to 320 degrees. Spray a 9in springform pan with non-stick baking spray.

2. To make the crust, take all of the crust ingredients and pulse together in a food processor or blender until fully combined. Press into the springform pan, moving up the sides about an inch or two. Put the crust into the oven for about 10 minutes or until slightly brownish. Take out and let cool while you make the cheesecake filling.

3. Using an electric mixer or handmixer, on a low speed combine the cream cheese with the sugar, extracts, and flour until smooth. Add in eggs one at a time, making sure to mix each egg in completely before adding another. Be careful not to overmix. Reserve 1/2 cup of the cheesecake and set to the side.

4. Pour the filling into the cooled crust. Pour the 1/2 cup of dulce de leches into the reserved 1/2 cup of the cheesecake filling. Whisk together, then drop spoonfuls of the cheesecake dulce de leches filling into the regular cheesecake filling. Swirl together with a butter knife.

5. Bake cheesecake for about an hour or until the cheesecake wiggles only slightly in the middle and the outside of the cheesecake is set.

6. Run a knife around the side of the cheesecake to loosen. Let cool at room temperature for another hour, then pop into the fridge for 5 hours or overnight.

Friday, February 25, 2011

Donut Muffins


Lately, I've been finding myself missing out on my morning "me" time. You know, that point in the day where you're actually by yourself and stalking checking out other peoples facebooks...

If you have kids, this part of your life is probably missing. Don't fret, it isn't gone forever. Unless you're my mom, who hasn't had a kid in years and still has them in her house at all times.

Apparently it's because she makes killer hot wings. But I think they just are fascinated by the fact that she wears a weave.

Actually, I probably wasn't suppose to mention that on the internet...


Anyway, "me" time... It's something I literally go out of my way to obtain. If I don't have a moment in the day where I'm literally by myself for an hour or two, I usually am in a horrible mood for the whole day. I just can't stand going a day without being able to sit down and just chill out. I like to get up early, early in the morning and do this. Everyone's sleeping and I can check my e-mail/facebook/etc in peace without having to worry about talking to anyone or doing anything. It's also my prime time to write, do devotionals, and pray.

But mostly, it's a time to enjoy my first meal of the day. Which for me is a big deal, because I absolutely love breakfast. If I had it my way, I'd probably eat breakfast for lunch and dinner as well. Whether it be waffles, pancakes, eggs/bacon sandwich, grilled cheese, yogurt and granola or apples with milk... I don't care. All I know is that I seriously dig breakfast.

Plus there's that whole bacon deal... Did I ever mention I used to eat plates of bacon for breakfast?

I also had really bad acne...

Yeah... Something to think about.

I also used to love to eat those powdered donut balls from Dunkin' Donuts. My Dad would occasionally buy them on Sunday mornings before church. Whenever he did, they were guaranteed to be gone by that night. I would sneak away with about five of them, washing them down with a cold glass of milk. Since I've moved to Louisiana, I scarcely have seen any Dunkin' Donuts... so those powdered donut holes haven't been in my life.

But thankfully, I found a substitute.

These babies are called Donut Muffins. While they can be rolled in coarse sugar or cinnamon sugar, I went with the powdered variety. Why? Because it's literally like biting into the love child of a beignet and a powdered donut. These babies are made with a good amount of butter, then brushed with MORE butter when they get out of the oven. Sweetened mostly by the powdered sugar, these beauties come out clean and neatly domed without the need of smoothing out the dough. They are soft, perfect, pillowy, and absolutely need to be drunk with milk or coffee. No doubt about it. And don't invite tea to the party. Save the biscotti for that.

Now, with a whole arsenal of these wrapped up and ready to be warmed and eaten, I'm definitel going to try a little bit harder to get that "me" time. I am literally counting down the hours until I can wake up and eat this delicious morsel. Maybe it's not the healthiest breakfast... but it's good for a treat every now and then. Hey, I won't tell if you won't.


Donut Muffins

INGREDIENTS:
3 cups unbleached all-purpose flour
2 ½ tsp baking powder
¼ tsp baking soda
Scant 1 tsp salt
½ tsp freshly ground nutmeg
¾ cup plus 1 Tbs whole milk
2 Tbs buttermilk
1 ½ sticks (6 ounces) unsalted butter, at room temperature
¾ cup plus 2 Tbs granulated sugar
2 large eggs

TOPPING
4 - 6 Tbs unsalted butter
1 ½ - 2 cups powdered sugar OR 1/2 cups cinnamon sugar OR 1/2 cup coarse sugar

DIRECTIONS:

1.Preheat the oven to 350. and set a rack to the middle position. Spray a standard-size muffin tin with cooking spray.

2. In a medium bowl, combine the flour, baking powder, baking soda, salt, and nutmeg, and whisk to mix them thoroughly. Set aside.

3. Combine the milk and the buttermilk in a measuring cup, and set aside.

4. Place the butter in the bowl of a stand mixer fitted with the paddle attachment (or, alternatively, in a large mixing bowl with electric beaters nearby), and beat on medium speed for a few seconds, until the butter is soft and creamy. With the motor running, add the sugar in a steady stream. Continue beating, scraping down the sides of the bowl once or twice, until the mixture increases in volume and lightens to pale yellow. It should look light, fluffy, and wonderfully creamy, like frosting. This could take a couple of minutes.

5. Add the eggs one at a time, beating until they are just combined.

6. With a wooden spoon, mix ¼ of the flour mixture into the butter mixture. Add 1/3 of the milk mixture. Continue to add the dry and wet ingredients alternately, ending with the dries. Mix until the dough is smooth and well combined, but do not overmix.

7. Divide the batter between the cups of the muffin tin. Bake until the muffins are firm to the touch and a toothpick inserted in the center comes out clean, about 25-32 minutes.

8. When the muffins are still slightly warm prepare the topping: melt the butter in the microwave or on the stovetop, and pour the powdered sugar/cinnamon sugar/sugar into a deep bowl.

9. Using a pastry brush and working one muffin at a time, lightly brush the entire outside of the muffin with butter, and then roll it in the powdered sugar/sugar/cinnamon sugar. Shake off any excess, and place the finished muffins on a rack or serving platter. Serve.

Wednesday, February 16, 2011

Tres Leches Cake (Three Milk Cake)

So I decided to go pink on Valentine's Day.

Real pink.

As in... Pink eye pink. Or should I say blood red.

Yeah. A box of chocolates has never been more needed.

It wouldn't have been so bad if I didn't have to go to the ER two days before Valentine's Day and have my eye forced open by a doctor because it was swollen shut. I was literally blind for the entirety of Saturday. I have never felt so helpless in my life before. You don't realize how much you need your eyes to do everything until you have nothing anymore.

So unfortunately, I spent my Valentine's Day inside, making this delicious Three Milk Cake.

In other words, it wasn't that bad. Plus, eye pain is the perfect excuse for second helpings of anything.

"But sweetie, my eye likes calories... it needs the energy to feel better!"

My boyfriend totally fell for it.
My doctor... ehh, not so much.

But what do they know anyway.

Tres Leches Cake, or Three Milk Cake, is a dessert quite popular in Latin America. Not only is it ridiculously easy but it's ridiculously delicious and most of the ingredients are pantry staples. I made it for my boyfriends mother, whose birthday falls on Valentine's Day. When I asked her what she wanted, it seemed to be a tie between a cheesecake and Tres Leches Cake.

Obviously, if she picked this over cheesecake, that says something.

My favorite part about this cake is the fact that it's a sponge and it literally does not dry out. Even if you leave it at room temperature or leave a piece uncovered in the fridge on accident, you wont have a dried out piece of cake. It stays moist and delicious, usually with a small pool of milk underneath. And the whipped cream on top stays soft and fluffy. Just the way it's suppose to be.

If you ever make a dessert for any Puerto Rican, Mexican, Honduran, etc, in your life, I guarantee you they will love it if you bring this to their house as a dessert. Just make sure you bring more than one.

Us hispanics like our food in bulk.

Don't judge.

(P.S. Do not, and I repeat, DO NOT buy premade whipped topping for this cake. It will not taste the same. If you're gonna make the cake, you gotta go with homemade topping.)


Tres Leches Cake
(adapted from the Pioneer Woman Cooks)
INGREDIENTS:

1 cup All-purpose Flour
1-½ teaspoon Baking Powder
¼ teaspoons Salt
5 whole Eggs
1 cup Sugar, Divided
1 teaspoon Vanilla
⅓ cups Milk
1 can Evaporated Milk
1 can Sweetened, Condensed Milk
¼ cups Heavy Cream

WHIPPED TOPPING
1 pint Heavy Cream, For Whipping
5 Tablespoons Sugar

INSTRUCTIONS:

1. Preheat oven to 350 degrees. Spray a 9 x 13 inch pan liberally until coated.

2. Combine flour, baking powder, and salt in a large bowl. Separate eggs.

3. Beat egg yolks with 3/4 cup sugar on high speed until yolks are pale yellow. Stir in milk and vanilla. Pour egg yolk mixture over the flour mixture and stir very gently until combined.

4. Beat egg whites on high speed until soft peaks form. With the mixer on, pour in remaining 1/4 cup sugar and beat until egg whites are stiff but not dry.

5. Fold egg white mixture into the batter very gently until just combined. Pour into prepared pan and spread to even out the surface.

6. Bake for 35 to 45 minutes or until a toothpick comes out clean. Turn cake out onto a rimmed platter and allow to cool. While cake is cooling, stick your mixing bowl and your spinners (whether its from a kitchenaid or handmixer) into the freezer along with the heavy cream for the whipped topping.

7. Combine condensed milk, evaporated milk, and heavy cream in a small pitcher. When cake is cool, pierce the surface with a fork several times. Slowly drizzle all but about 1 cup of the milk mixture—try to get as much around the edges of the cake as you can.

8. Allow the cake to absorb the milk mixture for 30 minutes.

9. To ice the cake, take out your thoroughly chilled mixing bowl and spinners and whip 1 pint heavy cream with 5 tablespoons of sugar until thick and spreadable.

10. Spread over the surface of the cake. Decorate cake with whole or chopped maraschino cherries. Cut into squares and serve.

Saturday, February 5, 2011

Orange Mini Bundt Cakes with Orange Glaze

Holidays seemed to have kicked me straight in the butt this year. Usually, I'd be baking up a storm all the way 'till Valentine's Day but I seem to have taken a long hiatus from the kitchen despite my beautiful new KitchenAid that I got for Christmas.

It definitely made things a heck of a lot easier... Though I'm pretty sure I pulled some kind of weird shoulder muscle getting that hunk of a machine out of the box and onto the counter.

Homegirl needs to go on a diet ASAP.

Maybe Christmas and New Years burned me out. Shafted along with Chris's 22nd birthday and our anniversary, blogging kind of had to take a backseat for a bit.

But now I'm back. And the Florida sunshine has not followed me into Louisiana territory.

I'm pretty sure it was so cold one night I could see my breath inside the car.

With the heater on.

Totally not awesome.


Among my KitchenAid I did get a lot of more cool gadgets...AKA, this awesome mini bundt pan. Along with one of those brownie pans, a gorgeous glass cake platter (that turns into a punch bowl), and some other little baking goodies in my stocking. Yeah... I got out good this year. And yes, I do still get a stocking. My mother and I made an agreement that I get to have a stocking until I'm married. And I'm not married yet. So there.


While I've made a couple of things already with this pan, It's really fun to make bite-sized versions of little cakes that just look so beautiful glazed or even dusted with powdered sugar. This cake in particular was delicious. Soaked up with an orange syrup and then finished with a zesty citrus glaze...if you're a fan of oranges, this is right up your alley.

I'll be posting more often soon, so be on the lookout for new posts. BTW, you can totally make these in a cupcake pan as well or double the recipe for a full-size bundt cake Just sayin'.


Orange Mini Bundts with Orange Glaze
(makes 12 mini bundt cakes or cupcakes)

Bundt Cake Ingredients:

1 3/4 cups unbleached, all-purpose flour
1 1/2 teaspoons baking powder
1/2 teaspoon baking soda
1/2 teaspoon kosher salt
8 tablespoons (1 stick) unsalted butter
1 cup granulated sugar
3 eggs
1 teaspoon pure vanilla extract
zest of 2 oranges
1 cup sour cream

Orange Syrup Ingredients:
1/3 cup freshly squeezed orange juice
1/3 cup sugar
1/2 teaspoon vanilla

Glaze Ingredients:
1 1/2 cup confectioner’s sugar
1 tablespoon cream
2 tablespoons freshly squeezed orange juice

INSTRUCTIONS:

1. Preheat the oven to 325 degrees. Spray a mini bundt pan with nonstick cooking spray (or line a standard muffin tin with 12 cupcake papers). In a medium size bowl, combine flour, baking powder, baking soda, and salt.

2. In the bowl of an electric mixer fitted with the paddle attachment, cream together butter and sugar and mix until light and fluffy, about 2 minutes. Add in eggs, one at a time, incorporating well after each addition. Add in vanilla and zest. Incorporate sour cream.

3. With the mixer on low, slowly add in dry ingredients and mix until well-incorporated, scraping down the bowl as necessary. Fill each bundt mold halfway with batter (if there is any extra, pour into cupcake liners in a muffin tin). Bake for 15-20, or until a toothpick entered into the center bundt comes out clean.

5. For the glaze: While the cakes are baking, in a small saucepan set over medium heat, combine sugar and orange juice. Boil for 1 minute. When the cakes come out of the oven, allow to cool for 5 minutes, then invert on a wire cooling rack. Pour warm syrup over each of the cakes.

6. Combine all ingredients for the glaze in a small bowl and drizzle over warm or cool cakes.


Dunk Twice Copyright © 2009 Cookiez is Designed by Ipietoon for Free Blogger Template