Tuesday, March 16, 2010

Identity Crisis White Cake with Strawberries

strawberryneopolitancakething


I truly believe that reality T.V. should come with a warning. Maybe like...

"WARNING! Please do not watch this show if you have any desire to keep hope for mankind." Or, "WARNING! Please do not watch this show if you have 4 feet of clean clothes to fold and put away and a sink full of dishes." Or even, "WARNING! Please do not watch unless you absolutely enjoy spending your time watching/making fun of/staring in disbelief at general human stupidity." Etc, etc...

Maybe, then, I wouldn't get stuck watching it so much. Then again, I could always get up and turn my T.V. off or change the channel... but every time I do that, I end up going to the food network, and for some reason Giada is always on. And while she's definitely not a horror to watch... I'm much more interested in seeing food than cleavage. Might as well go back to VH1 for that.

My mother and I were discussing reality T.V. last night. I'm definitely not as addicted* as her when it comes to keeping up with all the episodes but I shamefully enjoy a couple of them. My favorites happen to be celebrity fit club, tool academy, and occasionally celebrity rehab. And the next one that just started, Jessica Simpsons "the price of beauty" has already shown some kind of promise. I wouldn't even really count that as reality T.V. More like a comedy central skit with meaningful undertones. I mean seriously, Jessica... giggling in the middle of meditation with a bhuddist? Who does that?

Wait, i'm talking about Jessica Simpson, here. Why am I surprised? Kidding, kidding. Jessica, don't worry. I love ya for who you are. Really.

strawberryneopolitancakething


Anywho, so my mom and I were discussing reality T.V. and I had to laugh at what she was telling me. "You know," she began, "if these people want to lose weight (referring to celebrity fit club), they should just go on drugs. Then, they won't be hungry. And then they can go to celebrity rehab. And then they can go to sex rehab. Which will then lead them back to celebrity fit club..."

"Then they can make a show about finding their true love!" I piped in. "Yes, yes!" My mom laughed, agreeing. "...And then go right back to sex rehab." I slipped in smugly. We both broke out into fits of giggles.

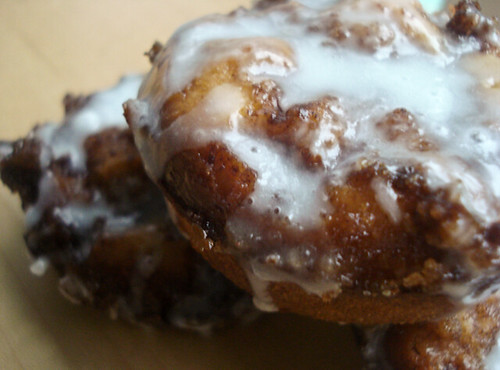
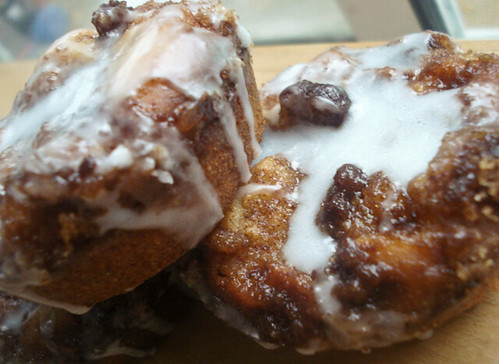
I don't think that there's anything really wrong with some Reality T.V... I think that I, along with everyone else in the world, have a hard time turning away from watching a train wreck. And that's basically what reality T.V. is half the time. Fake or not, it is pretty darn funny to watch if you don't take it so seriously.

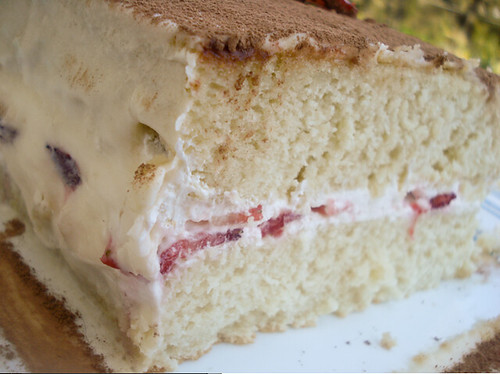
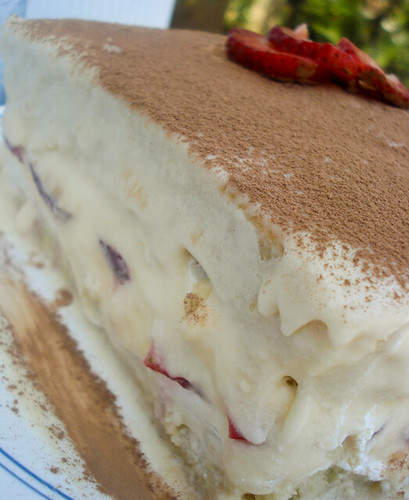
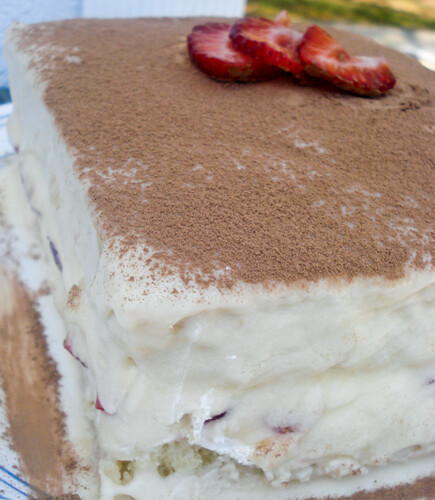
Plus, it's the perfect thing to watch when you're eating this cake. Because just like every single person on Reality T.V., this cake seems to be having identity issues. It can really relate.

strawberryneopolitancakething


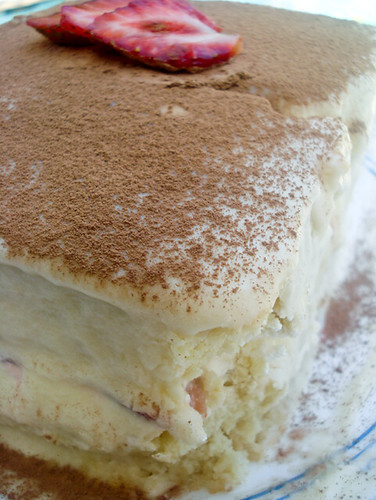
I mean, it really just can't decide what it wants to be. When it comes to fashion, it leans towards the whole strawberry tiramisu look... but in terms of taste, it's more like a frosted version of a strawberry shortcake. Some may even say it's borderline neopolitan. But me? Well... I just see it as exactly what it is. A white cake filled with strawberries, frosted with vanilla buttercream and dusted with cocoa powder.

So in other words, a really gosh darn good cake that came out way better than expected.

I don't know what compelled me to bake a cake yesterday morning. I just kind of winged it, putting together different things that my family enjoyed and throwing it all together. Thankfully, the end product is a divinely fluffy white cake, a not-too-sweet buttercream, a perfectly light fruity filling and a wonderful burst of cocoa powder that just rounds it all out. I like it a lot.

It's not hard to make, at all. Though, I do recommend frosting it better than I did, letting the cake cool in the fridge before frosting. I admit, I suck at frosting cakes. Don't ask me why, I just do. Something about my whole "too-impatient-to-wait-to-put-a-second-layer-on" thing... Who knows. All I know is that this cake is awesome and you should definitely try it if you want something light and sweet. Or if you're having an identity crisis, too.

strawberryneopolitancakething

Identity Crisis White Cake with Strawberries

(Makes 2 8 or 9in. cake pans, or 9x13 pan)

INGREDIENTS:

Cake
2 1/4 cup cake flour
4 teaspoon baking powder
1 teaspoon salt
3/4 cup granulated sugar
1/4 cup butter, softened
6oz (scant 1/2c) vanilla yogurt (fat free is fine)
1 tablespoon orange zest (optional, but highly recommended)
1 teaspoon vanilla extract
3/4 teaspoon almond extract
1/2 cup milk (I used unsweetened vanilla almond milk, but whole, soy or skim milk will work fine)
1/2 cup water
6 egg whites

1/2 cup raw organic cacao powder (or another good quality cocoa powder)

Filling
1/2 tub whipped cream (or make about 1 cups worth of homemade)
1/2 pint of strawberries, sliced thin

Vanilla Buttercream
1/3 cup butter, softened
2 1/2 cups powdered sugar
1/2 teaspoon vanilla extract
2-3 tablespoons milk

DIRECTIONS:

1. Preheat your oven to 350F and spray 2 9in. cake pans or a 9x13 baking dish with nonstick spray. Line with parchment paper if desired (RECOMMENDED).

2. To prepare the cake, sift the flour, baking powder and salt in a bowl. Set aside.

3. In a large bowl or mixing bowl, blend the butter, yogurt, sugar and orange zest if using together until smooth and light.

4. In a pyrex measuring cup or just a plain cup, combine 1/2 cup milk, 1/2 cup water, and extracts together.

5. In another separate, small bowl, using CLEAN mixers, whip the 6 egg whites until they form a nice soft peak (they don't have to be hard peaks, soft is fine... just make sure it isn't liquidy soft but structurally soft).

6. Alternating with the flour mixture and milk mixture, slowly blend in the flour, then the milk, then the flour, then the milk, then the rest of the flour, until well combined.

7. Take about 1/3rd of your egg white mixture and blend it straight in with a spatula to your cake batter. Proceed to FOLD NOT BLEND the rest of the egg white mixture to the bowl until there are only a few noticeable spots (do not over-mix at this point).

8. Pour batter in prepared pans, giving the side of the pan a nice little hit with your hand to smooth out the top of the batter. Bake for about 20-30 minutes or until a toothpick comes out clean in the middle.

9. Allow cake to cool before removing and storing in the refrigerator, tightly wrapped, or just allow to cool COMPLETELY before frosting.

10. To prepare vanilla buttercream, mix the butter and vanilla extract together until smooth. Add in the powdered sugar and 1-2 tablespoons milk (if your mixture is too thick, thin it out with a little more milk).

11. To assemble cake, either cut through the middle of the two cakes to create a four-layer cake, or simply keep them as is (your choice). You may also cut off the tops of the cakes for a more smooth surface, if desired (recommended). On the top of one layer of your cake, fill the top with about 1/4 of your whipped cream (prepared or homemade), smoothing out to around the edges. Top with strawberry slices, slightly overlapping. Place the other cake ontop of it, and smooth out the whipped cream around the edges with an offset spatula. Place in refrigerator to set for about 20 minutes.

12. Once filling has set, take the cake back out, and proceed to use about 1/2 of your frosting to do an initial crumb coating on your cake. Frost your cake as desired with 1/2 of the frosting, then place back into the fridge until crumb coating is set. Take back out, and frost the cake with the rest of the frosting. Smooth with offset spatula for a clean look.

13. Sift the top of the cake with cocoa powder before storing, covered, in the refrigerator, or keeping covered at room temp. Unfrosted/unfilled cake can be frozen for up to 2-3 weeks.

Saturday, March 13, 2010

St. Patty Whoopie Pies

st. patty whoopie pies


Imagine for me, if you will, a beautiful, crisp spring day. The sun is out. The skies are clear with maybe just a little puffy cloud here and there... A nice, refreshing breeze that blows up all the leaves that have fallen off the trees into the air, dancing around you as if trying to prove that there is life after death. That they are still beautiful even though they are broken, brown, and seemingly drained of their bright green pride. You are feeling new. You are feeling motivated. You are feeling like cozying up by a lake, reading a book, sipping coffee and maybe sharing a conversation with a friend or a stranger. You watch your kids outside, playing and getting dirt all over their gorgeous faces.

It's one of those days where you can't help but smile, open up the windows, breathe, and fully appreciate the oncoming brighter days. The knowledge that finally, the worst of winter has passed, and the time for sundresses, popsicles, beaches and lemonade has arrived.

When it comes to my favorite type of days... these have to be up there in my favorite. There is something just so renewing that comes with a gorgeous bright day that appears right after the more crummy, yucky ones.

It's gotta rain before it can shine, right? Right.

st. patty whoopie pies


So, with such a perfect day to take a hold of, I really wanted to make something pretty... and festive! Afterall, St. Patricks day is coming up, which means that making these cute little whoopie pies are a must. Best part about it? They are IN. CREDIBLY. EASY. Which means instead of staying inside and making these, you can quick whip 'em up, make 'em, prepare the frosting while they are baking and then all you have to do is assemble them and, if desired, roll them in some pretty bright green coarse sugar. Heck, even if you aren't irish... make 'em! Even better, find someone who is Irish and share them! Or just find someone who likes cookies and cream cheese frosting. I'm sure that can't be too hard. :)

Here's to brighter days for all of us.

And yes, I know I totally sounded like a hallmark card.

st. patty whoopie pies

Super-Easy-Peasy Whoopie Pies


INGREDIENTS:


For Cookies
1 box of french vanilla style cake mix (like duncan hines)
1/2 stick butter, softened
1 egg

For Frosting
4oz cream cheese, softened
1/4 cup butter, softened
2 to 2 1/2 cups powdered sugar
1 teaspoon vanilla
Coarse sugar, for decoration (*optional)

DIRECTIONS:

1. Prepare oven to 350F

2. For cookies, use a handmixer or kitchenaid to combine the cake mix, butter, and egg together until moist. Don't worry if mixture is a bit dry. For smaller, mini whoopie pies, drop by teaspoonfuls onto baking sheet. For normal whoopie pies, drop by tablespoonfuls.

3. Bake for 9-10 minutes. Take out and leave to set on pan for 2 minutes, then move to a wire rack to cool completely.

4. To prepare frosting, mix cream cheese and butter together until smooth. Add teaspoon of vanilla. Add powdered sugar in 1/4 cup intervals to mix until you get a consistency you like (I used 2 1/2 cups of powdered sugar).

5. When cookies have cooled completely, fill with about 1-2 teaspoons of cream cheese mixture, and sandwich cookies together. If desired, roll the edges of the cookies in coarse colored sugar. Store cookies in air-tight container in the refrigerator. Makes about 25 mini whoopie pies and 15 normal sized ones.

Thursday, March 11, 2010

Cinnamon Roll Muffins


cinnamon roll muffins

I love going to the dentist.

For serious.

No, not because of the drugs (I swear).
No, not because my doctor looks like one of those dorky guys in medical school with their smartypants black-rim glasses and "I know i'm totally awesome/smart but I'm all laid back about it" demeanor.
Not even because of the lollipop you get afterwards. Although that's always a welcomed bonus...

None of those things are reasons why I love the dentist.

I love the dentist... 'cause I love getting my teeth drilled.

There is something oddly comforting about someone working on my teeth. Whether it be extracting a tooth or somethin' else... It feels like a nice mouth massage. I know, I am so totally weird. And I mean, the headache afterwards really sucks, but man... The whole vibration in the mouth, against my tooth? So calming! Don't ask me why. I don't know. All I know is that it almost, ALMOST makes up for the fact that they stuck a needle in my mouth. Almost.

Now if they can only switch the lollipops for chocolate, we'll be in business.

I bring this up because I got one my lovely teeth taken out today. Thank God. There is nothing worse than a toothache... for real. I can take burning my hands on a hot pan. Heck, I can even take stepping on a piece of glass every now and then! And migraines. Pfft. One aleve and a nice nap and I'll be better in no time...

But toothaches? Nuh uh. No way. Toothaches = me curled up in bed for five hours crying. No fun. No fun at all.

So even though I'm sitting here, biting down on some gauze and still getting over the fact that ohmygodtheyputafreakingneedleinmymouth, I feel pretty relaxed. And very, very happy. No more toothaches for me. No sir.

Thankfully, I made these wonderful cinnamon roll buns before I went to the dentist. And he didn't even notice. Pffttt.


cinnamon roll muffins


I know, I know. A blog post about cinnamon roll muffins and dentists...Something isn't right here. But that's okay. Because cinnamon roll muffins are involved.

I've been wanting to make a REAL batch of cinnamon rolls for quite some time now... but to be honest, I fear yeast. Using it scares me. And the whole wait-for-an-hour-thing? Yeah. No thanks. When it comes to my cinnamon rolls, I am a woman of conveniance. Sure, maybe one day I'll make 'em from scratch. But till then, I think I'll just fall back on these cinnamon roll muffins. Not only are they dasterdly cute, but they are a quick breakfast/brunch delight and totally warming from the inside out on a very rainy, yucky day. And although they do use yeast, they came out great and I really didn't have any troubles at all.


cinnamon roll muffins

Make 'em! Surprise your family. They make your house smell heavenly. And they will kick any craving you may have to go down to your nearest cinnabun. Promise.

Just remember to brush your teeth after you eat one. ;)

Cinnamon Roll Muffins
(Adapted from Joy the Baker)


1 1/2 cups all purpose flour
1/3 cup sugar
1/4 tsp salt
4 tsp active dry or rapid rise yeast
2/3 cup warm milk (100-110F; low fat is fine)
3 tbsp vegetable oil
1/2 tsp vanilla extract
1 large egg

Filling/Topping

2 tbsp butter, room temperature
2/3 cup brown sugar
3/4 tsp ground cinnamon
pinch ground cardamom

Icing
1 cup powdered sugar
1-2 tbsp milk or cream

DIRECTIONS:
1. In a large bowl, combine flour, sugar and salt. Dissolve the yeast in a measuring cup filled with the warmed milk, then stir milk mixture, vegetable oil, vanilla extract and egg into the flour mixture. Mix well, until very smooth. Pour into prepared pan and let rest for 15 minutes.

2. While the dough rests, mix together butter, brown sugar, cinnamon and cardamom in a small bowl using a fork until all the butter has been incorporated into the sugar and mixture is crumbly. Divide the batter between 12 greased muffin cups. Sprinkle evenly on top of rested dough and press the mixture down into the dough with your fingertips (or swirl in with a spatula.)

3. Place pan into a cold oven, then set the oven temperature to 350F.

4. Bake for about 20 minutes, until bread is lightly browned at the edges and the center of the bread springs back when lightly pressed. Some of the sugar mixture on top may still be bubbling.

5. Cool for at least 30 minutes before whisking the powdered sugar and milk together to form an icing and drizzling it onto the bread. Serve warm. Leftovers can be reheated in the microwave.

Monday, March 8, 2010

Lemon-Cornmeal Cookies


lemon cornmeal cookies


I never thought that anyone would have to teach me the "proper" way to slice a lemon. Infact, I didn't even think twice when the servers from restaraunts would come over and bring me my tea/water with a dainty little lemon slice perfectly placed upon the rim of my glass. It was almost like I just assumed they came that way. Like somewhere there was a lemon tree with presliced lemons or something. Okay, maybe that's going a bit out there... but really, I never even once considered that the people inside the kitchen actually sliced the lemons themselves. Or that there was a certain way you had to do it.

Until I became one of those servers and was told by my manager to go slice lemons for tea. At first I thought, "okay, whatever, slicing lemons... not that hard" and as I washed the lemons clean and placed them on a cutting board to slice, I sliced them right down the middle (first mistake) and then tried awkwardly slicing them in strips.

In other words, I had no idea what the heck I was doing.

lemon cornmeal cookies


Thankfully for me there was a nice man who saved me, though I still got a wild look from my manager later on when she walked in and saw me being taught how to slice a lemon ("you don't know how to slice a lemon!?") as if it was the most simple thing in the world. And now that I know how to do it, I realize that it probably is. Given the fact that you have common sense. Something I seem to lack in these situations.

Anywho, he taught me how to properly slice the lemons WITHOUT the danger of cutting off my fingers. He told me the trick is to hold the knife a certain way in which the blade rests against your fingertips as you move along slicing, therefore if you slip up accidentally the risk of you havings stubs for fingers is scarce. I wanted to give the man a hug, but I refrained, and kept slicing lemons. Soon I got them to be just like those dainty little slices you find on your glass.

I felt like a lemon-slicing pro. Like I could take on the world. Just the lemons, knife, and I. No tea anywhere would be without us.

Or, I guess, in this case, cookie.

Originally this recipe says to only use lemon zest, but I took the suggestion of the reviewers and added a nice little squeeze of fresh lemon juice to the batter. The difference? W-h-o-a! I can't even imagine what these cookies may have tasted like without the extra zip of juice, seeing as the cookies themselves were only lightly lemony tasting. Like a lemon bar in a crisp, very chewy cookie form.

One thing about them though is that they do, and will dry out, if kept at room temperature for too long. That, and if you leave these in your oven for too long, they can crisp up and burn real fast. So make sure you keep an eye on them. Especially if your oven tends to burn cookies. If you're super paranoid about it though, you can always put the cookie dough in the freezer a few minutes before popping it into the oven. This will help prevent burning, but it may also make your cookies "puff up" rather than spread.

lemon cornmeal cookies


These are delicious with a nice cup of espresso or just on their own as a light snack. The cornmeal especially gives them a distinct texture that I love. Give 'em a try. I don't think you'll be disappointed. Just don't skimp on the juice!


Lemon Cornmeal Cookies
(Adapted from Cooking Light)

INGREDIENTS:
1 cup all-purpose flour (about 4 1/2 ounces)
1/3 cup yellow cornmeal
1/2 teaspoon baking soda
1/4 teaspoon salt
1/4 teaspoon ground ginger
3/4 cup plus 2 tablespoons sugar
6 tablespoons butter, softened
1 large egg
1 tablespoon grated lemon rind
2 tsp or 1 tbsp fresh lemon juice

DIRECTIONS:

1. Preheat oven to 350°F.

2. Lightly spoon flour into a dry measuring cup, and level with a knife. Combine flour and the next 4 ingredients (through ground ginger); stir with a whisk. Combine sugar and butter in a large bowl, and beat with a mixer at medium speed until light and fluffy (about 5 minutes). Scrape sides of the bowl occasionally. Add egg; beat well. Beat in grated lemon rind. Add flour mixture to butter mixture, and beat at medium-low speed just until blended.

3. Spoon about 1 1/2 teaspoons batter 2 inches apart onto 2 parchment-lined baking sheets. (Note*: I rolled mine into 1 1/2 teaspoon balls with damp hands to keep from sticking, then sprinkled the cookies with a generous amount of granulated sugar, patting the cookies down very lightly before baking to get a more even spread and a crisp sugar coating). Bake at 350° for 12 minutes or until lightly browned underneath, almost firm around the edges but still slightly underbaked in the middle. Remove from oven. Cool on pans for 1-2 minutes or until firm. Remove from pans. Cool completely on a wire rack.

Yields 30 cookies.

Friday, March 5, 2010

Swedish Visiting Cake

Swedish visiting cake


I have to apologize for going (once again) randomly A.W.O.L on my blog. But somewhere between the excitement of finally finding a good job (that I liked), fitting that job into my daily schedule, fitting my baking/social life/videogames/cookie-eating around my job, quitting my job half a week later due to harrassment from my manager, being depressed about said job and eating copious amounts of cookies to cheer me up and then feeling even more depressed due to the fact that I ate copious amounts of cookies, I was just not really in the mood to blog.

Throw in the fact that I'm not allowed to go running and you got yourself a recipe for stress.

But thankfully... thankfully there are simple things in life. Thankfully there is flour, eggs, and sugar. Thankfully, there is an oven that works and mouths to be fed. Cookbooks to be read and ovens to be turned on at 350 degrees.

Thankfully there is... cake.

Swedish visiting cake


If there is anything more simple than this cake... I would like to find out what it is. Or, rather, if there is anything as simple and good tasting than this cake.

Dorie Greenspan... you're a genius, man (like my little rhyme there? Smoooooth).

This cake, a "swedish visiting cake", is spectacular. Though it uses common ingredients found in most cakes, it has a different way of mixing, thus giving the cake a very crumbly, almost sweet bready taste. With this particular dessert, there is no shame in using your finger tips to eat it. As long as it's accompanied with a napkin to catch the crumbs that will inevitably scream mutiny and try to escape from your grasp, leaving its brothers and sisters to accept their fate...

The crumb. It lives to see another day.

If you've got some almonds, sugar, butter, lemon zest and eggs on hand...then I highly recommend making this cake. It's simple. It's easy. It won't get you fired from your job. In fact, it might just get you promoted. And the cool part is? You can even make it in a cast-iron skillet for ultra awesome presentation. Or you can be like me and use a cake pan. Whatever works.

Swedish visiting cake
Swedish Visiting Cake
(adapted from Baking, From My Home to Yours by Dorie Greenspan)


INGREDIENTS:
1 cup sugar, plus extra for sprinkling
Grated zest of 1 lemon
2 large eggs
1/4 teaspoon salt
1 teaspoon pure vanilla extract
1/2 teaspoon pure almond extract
1 cup all-purpose flour
1 stick (8 tablespoons) unsalted butter, melted and cooled
About 1/4 cup sliced almonds (blanched or not)

DIRECTIONS:

1. Center a rack in the oven and preheat the oven to 350 degrees F. Butter a seasoned 9-inch cast-iron skillet or other heavy ovenproof skillet, a 9-inch cake pan or even a pie pan.

2. Pour the sugar into a medium bowl. Add the zest and blend the zest and sugar together with your fingertips until the sugar is moist and aromatic. Whisk in the eggs one at a time until well blended. Whisk in the salt and the extracts. Switch to a rubber spatula and stir in the flour. Finally, fold in the melted butter.

3. Scrape the batter into the pan and smooth the top with a rubber spatula. Scatter the sliced almonds over the top and sprinkle with a little sugar. If you're using a cake or pie pan, place the pan on a baking sheet.

4. Bake the cake for 25 to 30 minutes, or until it is golden and a little crisp on the outside; the inside will remain moist. Remove the pan from the oven and let the cake cool for 5 minutes, then run a thin knife around the sides and bottom of the cake to loosen it. You can serve the cake warm or cooled, directly from the skillet or turned out onto a serving plate.
 

Dunk Twice Copyright © 2009 Cookiez is Designed by Ipietoon for Free Blogger Template