Monday, November 30, 2009

Cranberry Almond Cream Cheese Muffins


Can I be honest for a second?

I am not a muffin person.
At all.

When I sit down and think about what I want for breakfast, I never think: "Gosh, I could really go for a jumbo blueberry muffin right now..."

New York crumb cake on the other hand, is an entirely different story. But that's irrelevant.

Muffins aren't usually on my list of things I crave; I'd go for a bowl of oatmeal with some sliced bananas and cinnamon before I'd go for a banana muffin, even if it had the same taste as my oatmeal.

I guess what I'm trying to say is that I'd rather eat something that looks like more for breakfast than just a hand-sized muffin.

I'm also not a cranberry person... unless those cranberries are reduced to a sauce with balsamic vinegar and lots and lots of sugar. They are way too tart for my liking and I even dislike craisins, to an extent, because they are too sweet. Cranberries seem to get a bad rep in my life for being too tart or too sweet, so I never got into the habit of using them or eating them or including them in my every-day diet.

So the fact that one of the first baking recipes I ever made from scratch was: 1) A muffin and 2) filled with cranberries; is sort of ironic in a funny "wow, that's unexpected" kind of way.

But I've come to realize that bakers are just that. Unexpected. Weird. A little funky. And a little too quick to lick the spatula.

(Yeah, right. Since when is anyone too quick to lick the Spatula/bowl/detachable mixer handles?)

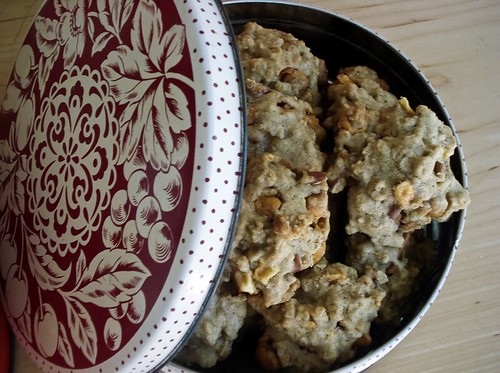
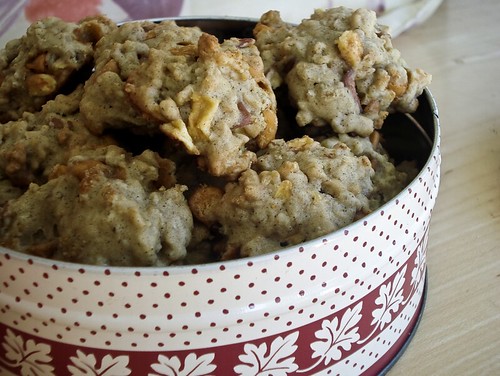
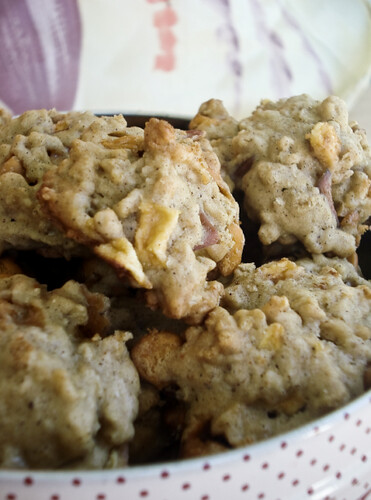
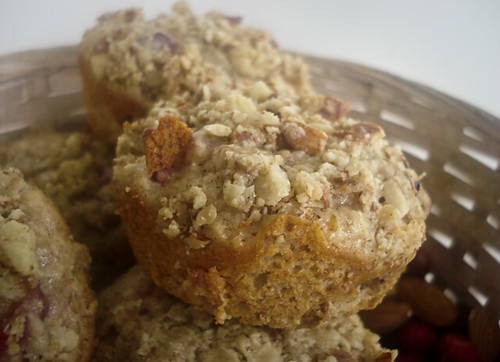
Personally, I love my little almondy cranberry muffins. They pack some serious moistness due to the fact that they are made out of 8 ounces of cream cheese instead of a cup of butter. In fact, these little muffins are probably low-carb power houses and if you happen to be on a low-carb diet then you'll wanna whip these babies up in no time because they are pretty gosh darn filling.

They don't need any additional oil to keep them nice and mosit -- the cream cheese does all the work. And the fact that they've got about 3/4 cup of oats thrown into them just means you're getting your whole-grain carbs, too!

Okay, now I'm just looking for excuses to make a muffin sound healthier than it is.
Forgive me. Some days I'm a baker. Some days I'm a dietitian. It's a rough line to balance on.

While you can choose to bake these in regular muffin tins, I go for the mini muffins one, just because that means that I have more of them and plus -- everything looks cuter when it's mini. Except Minnie Mouse. She's just creepy.

So if you're not like me, and you like cranberries and muffins, definitely make these. They're good. They're kinda good for you. And they are totally yummy.

Cranberry Almond Cream Cheese Muffins
(Recipe By: Alexandra Ramirez)

INGREDIENTS
1/2 cup all-purpose flour
1/2 cup whole wheat flour
1/2 cup almond meal/almond flour
3/4 cup oats, quick-cooking
1/2 teaspoon salt
4 teaspoons baking powder
1/4 teaspoon cinnamon
8 oz cream cheese, softened
3/4 cup sugar, divided
1/4 teaspoon vanilla extract
2 eggs
2/3 cup buttermilk
1/2 cup fresh chopped cranberries
1/2 cup finely chopped almonds or slivered almonds

CRUMB TOPPING
1/2 cup almond meal
1/4 cup chopped or slivered almonds
6-7 tablespoons butter, melted
2 tablespoons sugar

DIRECTIONS

1. Preheat oven to 350F and grease 2 12 cup mini muffin tins (or a 12 cup regular muffin tin)

2. Whisk together flours, oats, salt, baking powder, and cinnamon in a small bowl. Set aside.

3. In a large bowl, beat together cream cheese with 1/2 cup sugar until smooth and creamy. Add vanilla extract, and beat in briefly.

4. In another seperate bowl, whisk together 2 eggs and remaining sugar until smooth and thick. Pour into the bowl with cream cheese, and blend on low until just combined (be careful not to overbeat here).

5. With a wooden spoon or spatula, begin to stir in flour mixture slowly. As you are stirring in the flour to the cream cheese mix, slowly pour the buttermilk in along with it. Continue to stir until there is no flour left. Your batter should be very lumpy but still wet.

6. Stir in cranberries and almonds.

7. Fill in muffin cups with batter about 3/4 of the way (a heaping tablespoon should do it for the mini muffin tins).

8. Prepare crumb topping by stirring the almond meal, chopped almonds and sugar together. Add melted butter. Stir until thoroughly coated and crumbly. Sprinkle generously over muffin tops.

10. Bake at 350F for 15-18 minutes. Muffins should be lightly brown on their sides but still generally light colored. When out of the oven, loosen the edges of the muffin from the tin with a clean, slick knife. Remove and cool on wire wracks.

Makes 24 mini muffins or 12 regular sized ones.

Friday, November 27, 2009

Marbled Pumpkin Cheesecake


I am starting to slowly realize that when it comes to holidays, sometimes it's best to just stick with what people like, instead of going all out to change every single thing. You know what I mean?

Sure, it's cool to show off with some fancy shmancy roasted garlic mashed 'tatoes... It's awesome to come up with some magnificent cake with perfectly iced fall leaves on top for decoration. It's fun to sit there and come up with ways to make your cornbread stuffing that much better than last years stovetop...

It's understandable for a foodie to wanna go all out to impress guests and family.

But sometimes. Sometimes you just needa little somethin' that's traditional.
And i'm thankful for that.

I'm thankful for the instant mashed potatoes, the freeze and bake biscuits, and the simple stick-in-the-oven-and-fuggeddaboutit turkey (that was my awesome donnie brasco impression). I'm thankful for it all. Because regardless of whether it's homemade or store-bought -- it still brings a family together. And that's what actually matters.

Truth.

I'm also thankful for this Marbled Pumpkin Cheesecake.
And i'm pretty sure everyone else at the dinner table last night was, too.
(P.S: Did I mention that it's lower in fat & calories than the original recipe? Second slice, please.)

"Snappy" Marbled Pumpkin Cheesecake
(Adapted from Taste of Home, August/September 2008)

CRUST
1 cup cinnamon graham cracker crumbs
1/2 cup ground cornflakes (grind them in a food processor until they get crumby)
1/2 cup finely chopped pecans
1/4 cup butter, melted

FILLING
2 8oz packages of neaufchatel cheese (or 1/2 reduced fat cream cheese), SOFTENED
1/2 cup granulated sugar
1/4 cup brown sugar, packed
1 teaspoon vanilla extract
3 eggs, lightly beaten
1 cup canned pumpkin
1 teaspoon ground cinnamon
3/4 teaspoon ground nutmeg

DIRECTIONS:
1. Place a greased 9 inch springform pan on a double thickness of heavy duty foil (about 18in. square). Securely wrap foil around pan. Set aside.

2. In a small bowl, combine cinnamon cracker crumbs, ground cornflakes and pecans. Stir in butter. Press to the bottom and 1inch up the sides of your 9 inch springform pan. Bake this at 325F for 9 minutes or until set (should be a darkish slightly golden brown). Take out and cool on a wire wrack.

3. Meanwhile, in a large bowl, beat SOFTENED cream cheese and 1/2 cup sugar until smooth. Beat in vanilla. Add the eggs; beat on low speed until just combined (DO NOT OVERBEAT).

4. Place 1 cup of the cheesecake filling in a seperate bowl. To that seperate bowl, add the pumpkin, cinnamon, nutmeg and 1/4 cup of brown sugar. Stir together to combine. Remove 1/2 cup of the pumpkin filling and set aside.

5. Pour remaining pumpkin filling into the crust. Top with plain cheesecake filling. Now go to the 1/2 cup of pumpkin filling you set aside, and with a large tablespoon, just scoop and drop spoonfuls ontop of the cheesecake. Take a smooth knife (butter knives work best) and just run it through the top of the cheesecake to get a marbled effect. Have fun with it!

6. Place the springform pan into a larger baking pan (like a roasting pan or a large 13x9 baking pan; the kind you'd bake brownies in) . Add some hot water inside the baking pan (NOT ontop of the cheesecake) until the water comes up 1inch. Bake for 50-60 minutes or until the top is just set and looks slightly dull (to check if it's set, tap the sides of the pan. If the center jiggles slightly, it's ready to come out).

7. Cool on a wire wrack for 7 minutes. Run a clean, smooth knife around the edges of the cheesecake pan to loosen the crust from the pan. Cool 1 hour longer.

8. Refrigerate cheesecake overnight. Then remove the sides of the pan and reward your patience with one big slice o' cheesecake. ;]

Monday, November 16, 2009

Back there and again.


I'm sorry for the lack of updates. Really, I am. But this time, I have a good excuse. I promise.

Usually, when I don't update my blog, it's due to:

1) Being too busy doing other things (or my subtle way of saying I was too lazy).
2) I didn't take pictures of what I've been making
3) I didn't like the pictures of what I made
4) What I made got eaten before I could go to my room to get my camera.

In all truth though, the first one is the most common. I know. Not cool, Alex.

This time though, I have a good excuse. A really good one. Y'see, while you all were w
aiting for me to update with some more seasonal goodies, I was busy in New Orleans eating my pants size worth of these:


If you don't know what these are, then... Oh, God. I'm so, so sorry. Seriously. I fantasize about these. I fantasize about waking up to a warm plate full of these with a big cup of steamin' hot coffee every day. I fantasize about all that powdered sugar going everywhere everytime I even move or breathe wrong (quick personal note: never laugh when eating a Beignet. Ever. As it will result in a death-consuming cloud of powdered sugar smoke.)

I was kind of hesitant to try one. After all, Beignets are basically deep-fried dough. But they were so light and the edges -- Oh god, they were my favorite part. So crisp and chewy. Honestly, if I lived in New Orleans... Cafe' Du Monde would never go out of business. Truth.

But anywho.


While I could use the whole "I was in New Orleans eating Beignets! You have to believe me!" excuse as to why I haven't updated, I'll give you a real one, which is: ... I had no baking equipment. At all. Yeah, tell me about it. Unfortunately I'm not quite sure how security check out would deal with me bringing a deadly mixer on board of the plane -- and I don't think my luggage could carry a 20lbs bag of flour and sugar. So I had to leave my baking behind for a week or two. And I have to say this: I did miss it. But that's okay. We're back on track now and kicking off the ride with a cookie I think you'll find good enough to forgive me for.


These little oatmeal cookie delights are filled with a cool autumn combo of diced apples and butterscotch chips. When they come out of the oven, they can get pretty crispy -- but if you leave them out for awhile, they become incredibly moist and cakey. So if you like your oatmeal cookies crispy, you should definitely make and eat these the day they are made. If you like 'em cakey, then just make 'em, and let them sit out on the counter uncovered overnight. Or, better yet, store 'em in the refrigerator in a air-tight container. These taste really good served cold. But i'll let you be the judge of that.

The apples and butterscotch really shine here, with some help from a dash of cinnamon and some pumpkin pie spice. Not only that, but I replaced 1/4 cup of the butter in the original recipe with some applesauce, keeping these nice and moist and bringing out a more natural sweetness that helps the apple flavor a lot.

I think you'll like 'em. Hell, I know I did, and I'm not a big oatmeal cookie fan. These could probably do with some chopped walnuts thrown in, if you like your cookies a little on the nutty side. Pecans or almonds probably wouldn't contrast as well with the apples/butterscotch chips, though.

Happy eatin' foodies! And look for updates. I promise I won't run off on you for some donuts again.

Well. Maybe.

Butterscotch and Apple Oatmeal Cookies

INGREDIENTS:
1/2 cup butter
1/4 cup applesauce
1/2 cup brown sugar
1 large egg
1 teaspoon vanilla
1 1/2 cup all-purpose flour (I used 1 cup AP and 1/2 cup whole wheat)
1 teaspoon baking powder
1/2 teaspoon baking soda
1/2 teaspoon salt
1 teaspoon ground cinnamon
1/4 teaspoon ground nutmeg
1 cup finely chopped apples (about 1 big apple, 2 medium ones and 3-4 small ones)
1 1/2 cups quick-cooking or regular oats, uncooked
1/2 cup butterscotch chips

DIRECTIONS:
1. Preheat your oven to 325F. Cream the butter; add the brown sugar and applesauce and beat until light, fluffy and there are no brown sugar chunks.
2. Beat in egg and vanilla.
3. Add flour, baking powder, baking soda, salt, cinnamon, and nutmeg. Beat until well combined.
4. Gently stir in apples, oats, and butterscotch chips.
5. Drop dough by heaping teaspoon or tablespoon fulls on a baking sheet lined with parchment paper (or just grease it with nonstick cooking spray). Bake at 325 for 10-12 minutes, or until edges are golden brown. Remove from pan and cool on a wire rack.

Makes about 2 dozen cookies depending on size. Store in air-tight container in fridge or leave at room temperature uncovered.


Dunk Twice Copyright © 2009 Cookiez is Designed by Ipietoon for Free Blogger Template