Showing posts with label white chocolate. Show all posts

Saturday, February 13, 2010

White Chocolate Rice Krispy Hearts

White Chocolate Rice Krispy Hearts


Love, love, love, love.

It's everywhere this weekend. You can't escape it. The chocolate. The pink. The red. The hearts. The Barry Manilow songs playing in the background of every department store...

At least chocolate is on the list.

V-day is one of those holidays that I think is ridiculous. Of course, that doesn't mean I don't celebrate it. I do. Any excuse to eat a box of chocolates, or make some cute heart shaped treats for people I love is good enough for me. But, I really think that Valentine's Day should be every day! You know what i'm sayin'? Although I won't deny that i'd enjoy a night out at some fancy schmancy restaurant that serves REALLY good, warm, handmade bread (oh lord, would I love that) and way too much food for my tiny self to eat; I would rather spend each day showing the people I love that I love them rather then pick a day out in particular. I wouldn't say i'm a fuddy duddy or anything... Regardless, I am totally going to smother my special someone on Sunday. But I'll also do it on Monday. And tuesday. And wednesday.

Though we won't be going to any fancy schmancy restaurant, we will still have a wonderful day just spending time together. And that's all that matters to me.

White Chocolate Rice Krispy Hearts


Anywho, enough about my Valentine's Day philosophy's. These yumyums are amongst the many things that I love. Besides chocolate, anyways. Not only that, but their simple, easy, and budget friendly. And seriously... who doesn't like butter, marshmallows, rice krispies and white chocolate?

Tie it all up with a pretty ribbon or cut it out into heart shapes and you've got yourself a sweet treat that will melt your babies heart in a minute.

White Chocolate Rice Krispy Hearts


So go on! If you don't think you'll have time to make something big for your loved one, this is definitely a killer way to still do it without too much hassle. And who knows, maybe these little delights will sweep your crush off their feet.

As for me, I don't think that any amount of heart shaped goodies will get Johnny Depp to fall in love with me. But hey, it's worth a shot.

White Chocolate Rice Krispy Hearts

White Chocolate Rice Krispy Hearts
(bear not included)


INGREDIENTS:
1/4 cup butter, plus more for greasing the pan
5 cups rice krispy cereal
3 cups miniature marshmallows
1/2 cup white chocolate chips
1 cup (or 8oz) white chocolate, finely chopped
1/4 cup heavy cream
1 drop of neon pink food coloring (optional)

DIRECTIONS:

1. Butter a 9x13 inch baking pan with butter liberally.

2. In a large saucepan (make sure it's big!), melt 1/4 cup of butter over low-medium heat.

3. When butter is melted, add marshmallows and pink food coloring, if using

4. When marshmallows are mostly melted and mixture starts to boil slightly, remove from heat and stir in the rice krispy cereal and white chocolate chips. Make sure to stir it very good so the mixture is well combined.

5. Pour mixture into prepared pan, using the back of a spatula or buttered parchment paper to spread the mixture evenly throughout the pan. Smooth the top with an offset spatula if it's very bumpy.

6. In a microwave safe bowl, place the chopped white chocolate and 1/4 cup of heavy cream together. Mix slightly. Place into microwave and microwave on high, stirring every 10 seconds until chocolate is smooth. BE CAREFUL NOT TO OVERCOOK. Mine usually takes about 20-25 seconds total before I can stir it enough that the chocolate melts completely.

7. Pour white chocolate mixture ontop of rice krispy treats, spreading with a spatula to cover the top.

8. Let mixture sit for about 2 hours. If refrigerating, let treats come to room temperature before cutting.

9. Cut into squares or heart shapes (if cutting into shapes, I recommend pressing the cookie cutter into the treats, and then using a very sharp knife to cut around the outlines. You will get smoother cuts this way).
Thursday, December 17, 2009

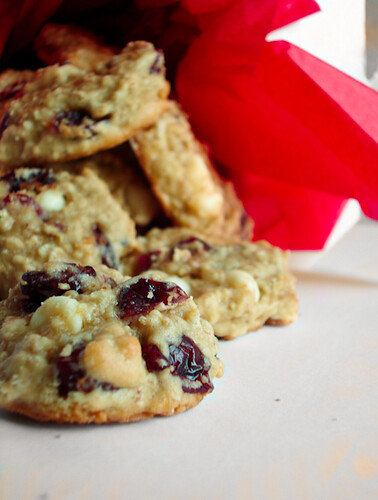
Cranberry White Choco Chip Oatmeal Bites


First, please forgive me for the offset color coordination of these photos. My camera... it defeats me sometimes, and adds weird reflections of other colored objects to my cookies when picture taking time comes around. It's not a very cooperative camera. But that's okay. It knows if it ticks me off too much it'll sit in its little dark corner in my drawer until it learns its lesson. Or until I have to use it again.

I'll admit it's usually the later. But whatever. It doesn't need to know that.

I've got this recent obsession with small little bite-sized cookies... which is awfully weird because I've been craving the opposite. But I just can't help but love how easy they come together and can be packaged and sent off as gifts or other. These little oatmeal bites are exactly what I'm talking about. They get their softness from the 1/4 cup of yogurt that replaces 1/4 cup of butter in the original recipe, a lightness from whisking an egg white in replace of a whole egg, a chewyness from the oatmeal bits and craisins and a slight crunch from the white chocolate chips that heavily stud every piece like little yummy jewels.


I just love it. I really do. And look how festive they are. Come on. The only dangerous thing about these cookies is the fact that anything easily popped inside the mouth will be gone in about... 10 seconds? Okay. I'll give you the benefit of the doubt... 15 seconds.

If you're looking for an easy way to whip up some easy package cookies that will stay moist and satisfy the sweet tooth in your life, then make these. Not only are they incredibly seasonal, but come on... Cuteness factor is out the door here. Don't deny it.


Cranberry and White Choco Chip Oatmeal Bites

INGREDIENTS:
1/4 cup butter, softened
scant 1/4 cup plain, non-fat yogurt
2/3 cup brown sugar
1/4 cup granulated sugar (*See footnote)
1 large egg
1 large egg white, briefly whisked
1 1/2 cup all-purpose flour
1 1/2 cup oatmeal, quick-cooking or rolled (I used quick cooking since its what I had on hand)
1/2 teaspoon ground nutmeg
1 teaspoon baking soda
1/2 teaspoon salt
1 6oz package sweetened dried cranberries
2/3 cup white chocolate chunks or chips (or 4oz, chopped)

DIRECTIONS:

1. Beat butter, yogurt and sugars* together. Mixture should not look light and fluffy but will be a little more on the liquidy looking side. That's okay. Add eggs one at a time, mixing well.

2. Combine oats, flour, nutmeg, baking soda and salt together in a separate bowl. Add to butter mixture in several additions, mixing well after each addition (don't skip this step!)

3. Stir in dried cranberries and white chocolate. Dough should be sticky. If dough seems too wet, mix in another 1/4 cup of flour.

4. Divide dough into 2 separate balls and cover them in plastic wrap or foil. Refrigerate for at least 2-3 hours.

5. Preheat your oven to 375

6. Drop by rounded teaspoonfulls onto ungreased cookie sheets. Bake for 10-12 minutes or until golden brown on the bottom and slightly set on top. Remove from sheets and cool on wire wrack. Makes about 2 1/2 dozen.

*Footnote: These are a little on the sweet side, so if you want you can probably only use 1 tablespoon of granulated sugar in replace of the 1/4 cup, or just forget the sugar entirely. The only reason why I added 1/4 cup of sugar was to cut the tartness of the plain nonfat yogurt which has a slight tang to it that I was scared wouldn't balance out with the brown sugar. So if you want, just cut the 1/4 cup out or just use a tablespoon if you're paranoid.

Sunday, December 13, 2009

Gingerbread bars with white chocolate icing


Sometimes, some thing just tastes so good, that you can't even compare what it tastes like with an actual taste. For example, say you're at a restaurant and you order the jerk seasoned shrimp with mango salsa and mashed sweet potato with fried plantains on the side... you taste it, and you get such an explosion of hot, spicy & sweet that sometimes all you can
say is: "Oh man. That tastes like the freakin' bahamas right there."

And somehow, everyone will nod their head and totally know exactly what you mean even though in reality it makes no sense whatsoever.

These bars... are kinda like that.

I want to say they taste like gingerbread bars that have been tinted with a nice white chocolate (and cream cheese) icing laced on top. I want to say they taste subtly spicy with a sweet tone. I want to say they taste like a thousand gingerbread men, only in cake form... but none of these seem to fit the description as well as my sister-in-laws words:

"It's like I just bit into Christmas."


Y'took the words right outta my mouth. Except not literally because that would be awkward.

Just look at these. They are so delicately weighed. Not too light or heavy. A perfect little snack cake that would do well with or without the icing (but because we like to take things to the next level and once is never enough, we'll just go ahead and ACCIDENTALLY cross over another healthy helping of lacy icing on these babies. Remember. Accidentally.) It's not rich at all and it
really does taste like you are biting into Christmas Day itself. It's like a total nostalgia rush to the fifth degree. Even if you've never had gingerbread before, you'll be swept away into Christmas.


Or just another piece.
Extra icing, please.

I was actually going to opt for Martha's AMAZINGLY DELICIOUS looking white chocolate gingerbread blondies BUT... 2 sticks of butter martha?! 2 whole sticks!?

...WELL, MARTHA, I DON'T HAVE TWO STICKS OF BUTTER TO USE. So you and your fancy pants recipe will just have to wait another week before they get their grips on my waistline.

So there.
(I'm sorry, I had to get that out. Forgive me.)

'Till then, I'm going to savor what has to be the best version of gingerbread I have possibly ever had. And I encourage you to do the same.


Gingerbread Bars with White Chocolate Icing
Stolen from Culinary in the Desert who adapted it from Bon Appetit

INGREDIENTS:

For gingerbread bars:
2 cups all-purpose flour, divided
2 teaspoons ground ginger
1 teaspoon cinnamon
1/4 teaspoon nutmeg
1/4 teaspoon ground cloves
1/2 teaspoon baking soda
1/2 teaspoon salt
10 tablespoons unsalted butter, softened
3/4 cup packed dark brown sugar
1/2 cup granulated sugar, divided
2 large eggs
1 teaspoon vanilla extract
1/4 cup molasses
1 cup white chocolate chips (optional)

For white chocolate icing:
1 oz white chocolate, melted and cooled
4 oz cream cheese, softened
3-4 cups powdered sugar
1/2 teaspoon vanilla extract
1 tbsp milk (optional)

DIRECTIONS:

1. Preheat oven to 350 degrees. Line a 13x9 inch pan with foil, with the foil going over the length-wise edges of the pan, sprayed with nonstick cooking spray. Set aside.

2. In a medium bowl, add flour. SCOOP OUT 2 TABLESPOONS OF FLOUR and place in separate bowl to reserve for topping.

3. Into the flour (not reserved flour), whisk in ginger, cinnamon, nutmeg, cloves, baking soda and salt. Set aside.

4. In large mixing bowl, cream together butter and 6 tablespoons of granulated sugar. Add eggs one at a time, beating just to combine after each addition. Mix in vanilla and molasses. Add dry ingredients and mix until just combined. Stir in white chocolate chips if using.

5. Scoop batter into prepared pan and, with an offset spatula, smooth out top. Sprinkle the top with reserved flour, then sprinkle the remaining 2 tablespoons granulated sugar over that.

6. Place into oven and bake until bars are golden brown and a toothpick comes out mostly clean with a few crumbs attached, about 20-24 minutes. Remove and place pan on wire wrack to cool completely before cutting.

7. While gingerbread is cooking, make the icing. take a clean medium-small bowl and blend together the cream cheese and powdered sugar. Blend in the melted white chocolate. Then blend in the vanilla. IF your icing is too thick, thin it out with a tablespoon of milk. If it's too think, add more powdered sugar.

7. When bars are cooled, lift the bars out of the pan with the foil that you lined over the edges of the pan. Cut into desired bars and, using a pastry bag (Or take a ziplock bag, put the icing in it and then cut off a little hole with scissors at the pointy tip), drizzle white chocolate icing over bars. Save leftover icing in fridge if desired.

Sunday, September 27, 2009

White Chocolate Orange Cookies


I've baked a lot of things in the past two years.

Cakes. Cheesecakes. Cupcakes. Brownies. Blondies. Ocassionaly pie. And, of course, cookies.

Out of all of these things, which one do you think scares me the most to make?

Would it be the cheesecake, so prone to failure that just a few seconds of overmixing, overbaking, or even breathing wrong can cause unsightly cracks that are only made perfect by slathering a bunch of chocolate ganache on top?

Would it be cake, that seems to always stick to my pans even though I lather them with butter, flour, and cooking spray?

Brownies? Blondies? Pies? Cupcakes?

No.
None of these.

You know what scares me the most?


Cookies.

Why, Alex?! They're so easy to make! You just make dough, refrigerate, drop into little balls on a pan and bake 'em for a few minutes!
Easy as 1, 2, 3!

Uhm.
I wish.

I really do wish it were that simple for me, but it's not. Cookies are, and will always be, my most feared baked goods to create. I love how creative you can be with them, don't get me wrong. A cookie is like a blank canvas. All you need is some butter, sugar, and flour, and you're pretty much good to go. Oh, and vanilla extract. Pure, please.

You can add anything. Chocolate chips. White chocolate chips. Cinnamon. Maple syrup. Heck, you can even add oats, raisins, and apples if you seriously wanted to. The possibilites go on and on and on and on...
It's not really what goes in the cookie that scares me. It's how the cookie turns out that does.

For some reason, whether it be crazy Floridian humidity or the fact that my baking sheets are like 32049204930 years old and have seen more cookies than the cookie monster, my cookies almost NEVER come out the way I want them to. Like this one time I tried to make the infamous "whoopie pies".... Yeah. Somehow instead of nice, fluffy, chocolatey cakey cookies, I got chocolate crisps that looked like flat tuiles. Lacey holes and all. HOW IS THAT EVEN POSSIBLE? I don't know. I don't want to know. The logic escapes me. Cookies escape me. I wish cookies didn't escape me, because I love a good, gooey, chewy cookie dipped in milk. But I'm cursed with the inability to make perfect cookies.

Thankfully, taste makes up for lack of desired texture. Especially in these White Chocolate Orange Cookies.

First off, the orange flavor is IRRESISTABLE OH MY GOD. And paired with the white chocolate? Holy. Crap. Make these. Now. Do it. Even though I didn't get the perfect chewy texture I wanted when I baked these, THEY STILL CAME OUT SO GOOD. Not only that, but since I kind of added a spicy kick to it, the ginger really brings out the orange flavor. The result is out of this world. Seriously.

So even though cookies escape me, I'm really glad that sometimes they do come out okay, or, at least, edible. And thank God they did because I think this is one of my favorite cookies, ever. So light. So yummy. Soooo good. They don't spread much during baking, so make sure to flatten them with your fingers a bit or with the back of a spoon.

White Chocolate Orange Cookies
Ingredients:
6 tablespoons butter, very soft
1/4 cup brown sugar
1/4 cup fine white sugar
1 egg
1/2 teaspoon vanilla extract
1 1/2 cup flour, sifted
1/4 teaspoon ground nutmeg
1/4 teaspoon ground ginger
1/4 teaspoon baking powder
1/4 teaspoon baking soda
1/4 teaspoon salt
Zest from 1 orange,
Juice from 1/2 orange
1/2 to 3/4 cup white chocolate chips (or chopped white chocolate)

Directions:
1. Beat butter and sugars together until fluffy.
2. Add the egg and vanilla extract, but don't mix yet.
3. Sift together the nutmeg, ginger, baking powder, baking soda, salt, and zest. Add to bowl.
4. Add the juice from 1/2 orange.
5. Mix all together until well combined. Be careful not to overmix.
6. Fold in white chocolate chips. If your dough is very, very sticky, add 1/2 cup of sifted flour.
7. Refrigerate dough for at least 1 hour.
8. Preheat oven to 350 degrees. Roll cookies into desired ball shapes and flatten on sheet slightly with your fingers or the back of a spoon. Bake cookies at 350 for 8-10 minutes (mine went for 8.) or until the bottoms begin to turn a golden brown.

Note: These cookies DO NOT SPREAD MUCH. So make sure to flatten them a bit. If you want chewier texture, leave them on the pan a bit before removing them to a cooling rack. If you want them crispier, leave them in for longer.

Don't worry if the cookies look a bit "doughy" in the middle... They will set up on the sheet and cooling rack.


Dunk Twice Copyright © 2009 Cookiez is Designed by Ipietoon for Free Blogger Template