Showing posts with label chocolate chip. Show all posts

Friday, November 12, 2010

Brown Sugar Bundt Cake with Maple Espresso Glaze


A long time ago, when I was a itty-bitty Alex who liked to run around in her PJ's all day and refused to wear actual clothes until she was well past 8 years old, my Mother baked me my own cake for my birthday.

It was a lovely box mix yellow cake with lovely Pillsbury white frosting slathered all over it. She made it in her Bundt Cake pan, and after she had frosted it completely, she decided it would be a great idea to stick a little doll figure angel in the middle of the cake. She then had an even better idea, which was to surround said doll figure with candles.

Candles.

Lit. Candles.

With fire.

Fiery candles of death.

I don't think anyone in the room thought it was the best idea, but she went with it anyway. And as she lit the candles, I still remember to this day the image in my head of that poor helpless doll sitting on top the middle of a thickly frosted bundt cake, surrounded in flames. As if the doll was being made as an ancient sacrifice to Chthulu and the candles were the natives lighting their torches getting ready for the sacrifice to their angry God.

Ok, so I wasn't exactly thinking that when I was a kid. But when I think about it today, that's all I see.

Now-a-days, It's hard for me to look at a bundt cake without thinking about that moment. It's not often that I eat bundt cakes. Anyone who knows me knows that I don't like cake. It's not my preferred dessert of choice and given the chance I will always pick something other than cake at the dessert table or party. Sure, I'll try it to be nice, but that's about as far as it goes for me. As I've touched on numerous times in my blog, it's no specific thing about cake that makes me dislike it. I just don't like the cake/frosting combo. Doesn't sit well with me or my tummy.

The thing about cake is that often, it has a dry crumb that gives it that kind of "stick to the roof of your mouth" chew that can be both unpleasant and yucky to many people. Dry crumbs are often caused by 1. using cake mix and 2. having not enough moisture in your cake. I've always thought anyone who can pull off a moist but not "wet" cake had a one in a million skill of being able to perfect the balance between a cake that has enough dryness in it to keep it together but has enough moisture to make it both tender, sweet, and melt-in-your-mouth quality.


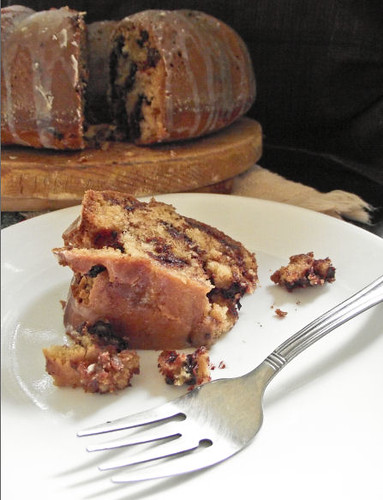
This cake...is nothing like that. In fact, it's a superb way to end any meal, or start any day with a thick slice for breakfast. The glaze on top is subtley sweet, giving a perfect finish to the caramely tasting insides. The crumb is both moist and satisfying, and the chocolate chips inside are just a fantastic added bonus that ties it all together and makes it much more than just a regular ol' cake with some glaze on it. Even I myself could be found picking off pieces of this cake here and there throughout the day. And that's definitely saying something.

If you wanted to, you could make the glaze a lot thicker. I like a thinner glaze on my cakes, so I used a bit more heavy cream. But if you like a thicker, more visually apparent glaze, go ahead and stick with the recipe below. And please, do not disclude the chocolate chips. They are worth the extra trip to the store. Promise.

Brown Sugar Bundt Cake with Maple Espresso Glaze
(Recipe by Bon Appétit)

INGREDIENTS:

Cake:
Nonstick vegetable oil spray
1 12-ounce package semisweet chocolate chips
3 cups all purpose flour, divided
2 teaspoons baking soda
1 teaspoon baking powder
3/4 teaspoon salt
1 cup (2 sticks) unsalted butter, room temperature
1 1/2 cups (packed) golden brown sugar
2 1/2 teaspoons vanilla extract
1 teaspoon maple extract
4 large eggs
1 cup buttermilk

Glaze:
1 cup powdered sugar
2 tablespoons pure maple syrup
2 tablespoons (or more) whipping cream
1 1/2 teaspoons instant espresso powder

DIRECTIONS:

1. Preheat oven to 325°F. Butter 12-cup Bundt pan. Spray pan generously with nonstick spray. Dust pan lightly with flour.

2. Mix chocolate chips and 2 tablespoons flour in medium bowl.

3. Sift remaining flour with baking soda, baking powder, and salt into another medium bowl.

4. Using electric mixer, beat butter and brown sugar in large bowl until fluffy, about 3 minutes. Beat in vanilla extract and maple extract. Add eggs, 1 at a time, beating well after each addition.

5. Mix in flour mixture in 3 additions alternately with buttermilk in 2 additions, beginning and ending with flour mixture. Fold in chocolate chip mixture. Transfer batter to prepared pan, spreading evenly.

6. Bake cake until tester inserted near center comes out clean and cake begins to pull away from sides of pan, about 1 hour. Cool cake in pan on rack 30 minutes. Invert cake onto rack and cool completely.

7. For the glaze, Combine powdered sugar, maple syrup, 2 tablespoons cream, and espresso powder in medium bowl. Whisk until smooth, adding more cream by 1/2 teaspoonfuls if glaze is too thick to drizzle. Spoon glaze decoratively over top of cake; let stand at room temperature until glaze is firm, about 1 hour. DO AHEAD: Can be made 1 day ahead. Cover with cake dome and let stand at room temperature

Friday, January 8, 2010

Peanut Butter Chocolate Chip Cookies

chocolate chip peanut butter cookies


Let me tell you something about my grandfather.

My grandfather does not approve of refined sugar, gluten, and caffiene. He is strongly against anything with that "really bad high fructose corn syrup stuff", prefers a glass of goats milk over cows milk, and would not be caught dead in ordering a burger from McDonalds. He does not like any ingredients that he cannot pronounce, and he is an avid lover of all things with seeds and anything labeled with the words "organic". When he's not busy talking about how I should really get out, exercise more, get some sun, etc, he is telling me all about the health benefits of raisins and protein drinks. In short, my grandfather is a very "healthy" man who eats all the right things and exercises daily and never sleeps in past ten in the afternoon.

Now, let me tell you something else about my grandfather.

chocolate chip peanut butter cookies


My grandfather is the first person to order dessert at a table. My grandfather is the first person to go for a second helping of cookies. He is the first to try everything and anything when it comes to sweets and he does not skimp when he gets his frozen yogurt (fat-free!) from the yogurt bar. He is the one that will have "just a little" slice of cheesecake, only to five minutes later come back and have "just a little" slice more. And yes, my grandfather would like whip cream and chocolate syrup with that. Thank you very much.

I always find it funny when our family gets together and my grandfather spends all night talking about being healthy and such, and everyone just rolls their eyes because they know he will be the one who dives head first into the brownie pan as soon as he smells them coming out of the oven, or as soon as he even gets the faint sound of someone opening the fridge door to get the nights big dessert out. It is something we all expect, and there hasn't been one time where he has let us down. My grandfather, needless to say, is a secretive sweet-tooth, and I am never surprised when I catch him sneaking a cookie into his mouth when no one is looking. And if you even think of saying, "Popops! (that's what we call him) I thought you don't eat sweets?" he will just laugh at you and say, "oh, i'm only having one, and that's it. I'm done. Really."

Sure, pops, whatever you say.

chocolate chip peanut butter cookies


So, by all means, my Grandfather would probably not approve of these cookies. Not only are they full of wonderful, beautiful butter, but they are also jammed pack with a cup full of Jif peanut butter, a duet of brown and white sugar, and a good helping of chocolate chips. Oh, and yes, it has flour in it.

In other words, these cookies are perfect, scrumptious, and a great addition to any cookie platter or just a really tall glass of milk. They are both chewy, soft, and definitely have a prominent "peanut butter" taste that I think a lot of peanut butter cookies lack (I personally never make a peanut butter cookie unless it has at least 1 cup of peanut butter in it).

I think that all things should be enjoyed in moderation, whether it be healthy or not. And that splurging a little on something sweet wont ruin your day. Actually, I'm pretty sure that these cookies could cure any bad day. Ever.

And if you're still not convinced, and going, "gosh, those look good, but my pants can't take it!"...

chocolate chip peanut butter cookies


You could always send your cookies to my Grandfather.

Afterall, he wouldn't "want them to go to waste". ;)

Chocolate Chip Peanut Butter Cookies
(Adapted from multiple peanut butter cookie recipes)


INGREDIENTS:
1 1/4 to 2 cups all purpose flour* (please, PLEASE see note below)
a dash of nutmeg
1/2 teaspoon baking powder
1 teaspoon baking soda
1/4 teaspoon salt
1/2 cup butter, softened
1 cup peanut butter (do not use sugar free/organic/reduced fat)
1/2 cup brown sugar, packed
1/2 cup granulated sugar
1 egg
1 1/2 teaspoon vanilla
1 cup chocolate chips
3 tablespoons milk* (optional, once again, PLEASE see note)

NOTE*: Please be wary that the amount of flour you'll use for this recipe will vary on your weather/house conditions, so DO NOT BE AFRAID of using more flour than recommended. I ended up using a whole two cups, and then my dough was too dry. If you do add flour and your dough gets dry, add 1 tablespoon of milk at a time to the batter until it reaches a smoother consistency.

DIRECTIONS:

1. Preheat oven to 350F degrees. Line a cookie sheet with parchment paper.

2. Whisk together flour, nutmeg, baking powder, baking soda and salt. Set aside.

3. In a large bowl, cream together the butter and peanut butter until just creamy and combined.

4. Beat in sugars, again, until just combined into the batter. Take care to smooth out any brown sugar chunks.

5. Beat in egg and vanilla.

6. Add the flour mixed and beat together until no flour remains to be seen. If your dough is too sticky, add 1/4 cup of flour. If your dough is too dry, add up to 3 tablespoons milk until it gets a creamy but not too sticky consistency.

7. Fold or stir in 1 cup chocolate chips.

8. Drop cookies onto sheet in rounded 1 inch balls onto the cookie sheet. Press each cookie down lightly with the back of a fork vertically and horizontally to get a "criss cross" shape (if you don't want the criss cross shape, press the ball down lightly with the bottom of a glass). Bake at 350F for about 10 minutes. Your cookies may look a little bit "soft" coming out of the oven but that's okay.

9. Leave the cookies on the sheet for a minute or two to set up, and then remove them and place them on a cooling wrack. Let cool completely.

Friday, December 11, 2009

Cakey Chocolate Chip Cookies


Reader, I know.
This is difficult.
This is hard.
This is not easy to do, and I understand.

That penguin cookie jar is seriously too cute for your mind to control. I know. I feel your pain.

Oh. And cookies. Those don't help either.


I'm not too big of a fan of chocolate chip cookies. This could be because mine always burn or turn out flat. Yeah, that whole nestle tollhouse recipe everyone raves about? Seems that no matter what I do, I get burned chocolate chip pancakes instead of sturdy cookies. It sucks. It really does.

I have yet to come across a chocolate chip cookie recipe that has successfully given me my kinda chocolate chip cookie -- crisp, slightly crumbly, not too chocolate and melt-in-your-mouth when dipped in cold milk. Those are my kinda chocolate chip cookies. I guess you could say even after all the chocolate chip cookies I've tried, I'm still a chips ahoy! girl at heart ;).

Still, it's hard to really care when you don't get a chocolate chip cookie recipe right. There are so many others out there, the possibilities are endless, and even if you get it wrong there are still some desperate relatives (or very hungry mice, apparently; but that's a story for another day) who will eat it despite it's flaws and enjoy it thoroughly. That's kind of what happen
ed with these cookies.

Their perfectly soft -- cakey and delicious with just the right amount of chocolate chips in each little ball. I could've make them tinier, to be honest. And it would have probably helped to put them in the fridge for a little while after dropping them on the cookie sheets so they wouldn't have spread and burned on the bottom. But that's alright. They still came out good and, surprisingly, keep very moist and still cakey after a week of being in an airtight container. Good deal.

So if you're the cakey chocolate chip cookie type, definitely whip some of these up. Or if you know someone who likes cakey chocolate chip cookies, give it as a gift! After all, it is the season of giving. And I promise they won't mind if you have slightly burned bottoms. Promise.

(And no, I am not the least bit disturbed by the fact that you have to remove the penguins head to get the cookies. I just see it as if he's got cookies on his mind -- haha, get it? yeahh. I'm good.)

Cakey Chocolate Chip Cookies
(recipe by Martha Stewart)
INGREDIENTS:
2 1/4 cups all-purpose flour
1/2 teaspoon baking soda
14 tablespoons (1 3/4 sticks) unsalted butter, room temperature
3/4 cup granulated sugar
1/4 cup packed light-brown sugar
1 teaspoon salt
2 teaspoons pure vanilla extract
2 large eggs
2 cups (about 12oz) semi-sweet and/or milk chocolate chips

DIRECTIONS:
1. Preheat oven to 350 degrees.

2. In a small bowl, whisk together flour and baking soda; set aside.

3. In the bowl of an electric mixer fitted with the paddle attachment, combine the butter with both sugars; beat on medium speed until light and fluffy. Reduce speed to low. Add salt, vanilla, and eggs. Beat until well mixed, about 1 minute.

4. Add flour mixture; mix until just combined. Stir in chocolate chips. Turn out dough into plastic wrap and refrigerate for 1 hour if desired.

5. When ready to bake cookies, drop heaping tablespoon-size balls of dough about 2 inches apart on baking sheets lined with parchment paper.

6. Bake until cookies are golden around the edges and slightly set in the center, 10 to 12 minutes. Remove from oven and let cool on baking sheet 1 to 2 minutes. Transfer to wire wrack, and let cool completely. Store cookies in airtight container at room temperature up to 1 week.

Monday, August 31, 2009

Oreo Chocolate Chip Cookies


No. Your mind is not playing tricks on you. This is not some weird blog miscommunication of sorts.

That is, indeed, a cookie in a cookie.
And the term "addictive" is an understatement for them.

Seriously, who came up with this? Who was the genius who came up with the idea of combining the two most deliciously dunked in milk cookies together in one?
Whoever it is, I want to give them the biggest hug ever and eat cookies with them. With lots and lots and lots of milk.

These cookies do not play nice. If you make them you might want to make sure that you are giving at least 90% of the batch away to other people and hoarding the 10% to yourself, 'cause these babies will break your diet in like, ten seconds flat, no doubt (which is why they went to sunday school instead of in my tummy :P).

Chocked filled with chocolate goodness. And the creamy center inside adds a texture and flavor that is so freakin' amazing you're gonna wanna get up and do the hokey pokey right there (or maybe that's just me).

When I got done making these cookies, I promptly showed my Birday (otherwise known as the man who eats all my food) the end results with a big smile on my face saying: "I put a cooke in a cookie." To this, he responded with "No, you don't do that to oreos. You do not put them in chocolate chip cookies." And when I affirmed to him that yes, I really did put a cookie in a cookie, a nice long darth-vader worthy "NOOOOOOOO" escaped him. Needless to say, I'm sure his mind will be blown when he gets to try them.

So, now that i've completely shattered your mind and tore a hole in the universe, I think you should totally make these. Their super, super easy! Just make sure you refrigerate the dough for an hour or two before you pop 'em in the oven. Trust me on this one. Oh, and leave these cookies on the baking sheet for a good 2-3 minutes before taking them off for maximum chewy-gooey-yummy-oh-my-god-another-please-ness. You'll thank me, if you haven't already.


Oreo Chocolate Chip Cookies
(Adapted from allrecipes.com)

Ingredients:


2 cups all-purpose flour
1/2 teaspoon baking soda
1/2 teaspoon salt
3/4 cup unsalted butter, melted (1 1/2 stick of butter)
1 cup packed brown sugar
1/2 cup white sugar
1 tablespoon vanilla extract
1 egg
1 egg yolk
2 cups semisweet chocolate chips
20 oreos, crushed

Directions:
  1. Preheat the oven to 325 degrees F. Grease cookie sheets/baking sheets or line with parchment paper.
  2. Sift together the flour, baking soda and salt; set aside. (I whisked mine together with a large whisk instead)
  3. In a medium bowl, melt the butter and wait for it to cool. When cooled, take our your hand-mixer and cream together the melted butter, brown sugar and white sugar until well blended. Beat in the vanilla, egg, and egg yolk until light and creamy. Use a wooden spoon or a spatula to blend in the dry ingredients until well blended.
  4. Add in the crushed oreos. Take your handmixer back out and beat on low speed for just a few seconds to break up the oreos in the dough.
  5. Stir in the chocolate chips by hand using a wooden spoon or spatula.
  6. Refrigerate cookie dough for atleast 1 hour.
  7. Drop cookie dough 1 rounded tablespoon at a time onto the prepared cookie sheets. Cookies should be about 3 inches apart. (I rolled mine into little balls and then flattened them slightly with the palm of my hand)
  8. Bake for 15 to 17 minutes in the preheated oven, or until the edges are lightly toasted. Cool on baking sheets for a few minutes before transferring to wire racks to cool completely. (DONT SKIP LETTING THEM COOL ON THE SHEETS. It produces a nice chewy cookie. And don't be worried if the top looks underbaked -- it will set once you let them cool. Also, mine only took 15 minutes.)
 

Dunk Twice Copyright © 2009 Cookiez is Designed by Ipietoon for Free Blogger Template