Saturday, February 20, 2010

A small hiatus.

I'm going to be taking a small hiatus from the blogging world for a bit. Life is kind of hectic right now and having time to bake is unfortunately not coming easy. But please bear with me, it'll only be for maybe a week and then we'll be back on track. :)

Hope to see you soon,
Alexandra

Saturday, February 13, 2010

White Chocolate Rice Krispy Hearts

White Chocolate Rice Krispy Hearts


Love, love, love, love.

It's everywhere this weekend. You can't escape it. The chocolate. The pink. The red. The hearts. The Barry Manilow songs playing in the background of every department store...

At least chocolate is on the list.

V-day is one of those holidays that I think is ridiculous. Of course, that doesn't mean I don't celebrate it. I do. Any excuse to eat a box of chocolates, or make some cute heart shaped treats for people I love is good enough for me. But, I really think that Valentine's Day should be every day! You know what i'm sayin'? Although I won't deny that i'd enjoy a night out at some fancy schmancy restaurant that serves REALLY good, warm, handmade bread (oh lord, would I love that) and way too much food for my tiny self to eat; I would rather spend each day showing the people I love that I love them rather then pick a day out in particular. I wouldn't say i'm a fuddy duddy or anything... Regardless, I am totally going to smother my special someone on Sunday. But I'll also do it on Monday. And tuesday. And wednesday.

Though we won't be going to any fancy schmancy restaurant, we will still have a wonderful day just spending time together. And that's all that matters to me.

White Chocolate Rice Krispy Hearts


Anywho, enough about my Valentine's Day philosophy's. These yumyums are amongst the many things that I love. Besides chocolate, anyways. Not only that, but their simple, easy, and budget friendly. And seriously... who doesn't like butter, marshmallows, rice krispies and white chocolate?

Tie it all up with a pretty ribbon or cut it out into heart shapes and you've got yourself a sweet treat that will melt your babies heart in a minute.

White Chocolate Rice Krispy Hearts


So go on! If you don't think you'll have time to make something big for your loved one, this is definitely a killer way to still do it without too much hassle. And who knows, maybe these little delights will sweep your crush off their feet.

As for me, I don't think that any amount of heart shaped goodies will get Johnny Depp to fall in love with me. But hey, it's worth a shot.

White Chocolate Rice Krispy Hearts

White Chocolate Rice Krispy Hearts
(bear not included)


INGREDIENTS:
1/4 cup butter, plus more for greasing the pan
5 cups rice krispy cereal
3 cups miniature marshmallows
1/2 cup white chocolate chips
1 cup (or 8oz) white chocolate, finely chopped
1/4 cup heavy cream
1 drop of neon pink food coloring (optional)

DIRECTIONS:

1. Butter a 9x13 inch baking pan with butter liberally.

2. In a large saucepan (make sure it's big!), melt 1/4 cup of butter over low-medium heat.

3. When butter is melted, add marshmallows and pink food coloring, if using

4. When marshmallows are mostly melted and mixture starts to boil slightly, remove from heat and stir in the rice krispy cereal and white chocolate chips. Make sure to stir it very good so the mixture is well combined.

5. Pour mixture into prepared pan, using the back of a spatula or buttered parchment paper to spread the mixture evenly throughout the pan. Smooth the top with an offset spatula if it's very bumpy.

6. In a microwave safe bowl, place the chopped white chocolate and 1/4 cup of heavy cream together. Mix slightly. Place into microwave and microwave on high, stirring every 10 seconds until chocolate is smooth. BE CAREFUL NOT TO OVERCOOK. Mine usually takes about 20-25 seconds total before I can stir it enough that the chocolate melts completely.

7. Pour white chocolate mixture ontop of rice krispy treats, spreading with a spatula to cover the top.

8. Let mixture sit for about 2 hours. If refrigerating, let treats come to room temperature before cutting.

9. Cut into squares or heart shapes (if cutting into shapes, I recommend pressing the cookie cutter into the treats, and then using a very sharp knife to cut around the outlines. You will get smoother cuts this way).

Tuesday, February 9, 2010

King Cake Cupcakes

kingcake cupcakes

Happy National Bagel Day!

I don't know how many celebrations you can cram into one day, but I'm sure someone out there is trying to score a meal for each ocassion. Which won't be hard, I'm sure. 'Specially if you live in New Orleans. Those people know how to party. Not that I would know or anything... *insert innocent whistle here*

Actually, in all honesty, I'm not really a party person. I'm more of the stay home and make fun of reality t.v. shows while kneading dough kind of person. But I do enjoy the ocassional outting with friends and having a couple of drinks. Though, I can definitely skip on the "freeing your boobies" part of partying. Especially when said boobies have some weird deformed overlarge nipples that have some kind of satanic piercing going on.

Sorry. You probably didn't want to hear that. Trust me. I didn't want to see it. Scarred for life much? You bet.

But let's not talk about that. Let's talk about cupcakes. King Cake Cupcakes!

kingcake cupcakes


Besides the whole letting your milk jugs express themselves openly, Mardi Gras celebrates the love of all things pastries. From fried foods, to pancakes, to King Cakes... It's not just in New Orleans, but in places like Latin America and the Carribean. Mardi Gras is celebrated the day before Ash Wednesday, and the festivities range from carnival activities to simply gorging out on all things sugary and fatty before the ritual of fasting for Lent. Although I'm pretty sure that most people who celebrate Mardi Gras are just looking for an excuse to eat a crap load of carbs. Hey, i'm not judging. Any day where it's socially acceptable to gorge out is cool with me. Then again, I like any excuse to bake horrible sugar-laden foods. Which is why these cupcakes definitely made my list of things to make.

I've never had a traditional King Cake, but I do know the basic ingredients on how to make one. Since I was thinking of actually making my own King Cake, I tried my hardest to learn all the techniques -- only to realize that I was quite a few ingredients short, and the whole process seemed very daunting. Instead, I took the easy way out and made an adapted, non-yeast version that can be made at your convenience. I'd say the most difficult part of making these was probably the wait time between cooling and decorating. After that, however, you better have a friend or two to invite over... Because these cupcakes are guaranteed to consume at least three different meals of your day. Seriously. They are GOOD. And by finely chopping the pecans, you get a nice little toasted nutty crunch in each bite. Which is awesome. Unless you have a nut allergy. Then, not so awesome... But I bet these cakes would taste great with, or without the pecans. They are that good, people.

Hope you all enjoy your sugar comas today. And don't forget to eat a bagel. It's just the right thing to do.

king cakecupcakes

King Cake Cupcakes


INGREDIENTS:

CUPCAKES:

1/2 cup butter, melted and cooled
1/2 cup brown sugar
1/2 cup granulated sugar
1 egg
1 cup milk
1 teaspoon vanilla
2 cups all-purpose flour
1 teaspoon baking soda
1/4 teaspoon salt
1 teaspoon cinnamon
1/2 teaspoon nutmeg
1/4 cup finely chopped pecans, toasted

ICING:
1 cup + 1 tablespoon powdered sugar
3 tablespoons warm water

+ Colored yellow, green and purple sugar for decorating

DIRECTIONS:

1. Preheat oven to 375F and spray 16 cupcake liners with nonstick spray.

2. Whisk together dry ingredients (flour, cinnamon, etc)

3. Whisk together butter and sugars until smooth. Whisk in egg, milk, and vanilla.

4. Stir in dry ingredients and pecans just until there is no trace of flour left (do not overmix, your batter will be lumpy -- that's a good thing).

5. Fill cupcake liners with batter, and stick in oven for about 10 minutes or until a toothpick comes out with just a few moist crumbs.

6. Cool on wire wrack.

7. Once cupcakes are cooled completely, whisk together the powdered sugar and warm water until smooth. Drizzle with a spoon over cupcakes liberally. Sprinkle with colored sugar/sprinkles.

Saturday, February 6, 2010

Classic American Yellow Cake with Chocolate Ganache

Yellow Cake with Chocolate Ganache


Dear 9,000 year old Bundt Pan,

Look. I know how it is. You sit, unused, at the bottom of my cabinet, alone and abandoned. I understand how scary it must be in there... forced to sleep in the shadows every night. And with the broken old bent springform pans, no less. Feeling so neglected, collecting dust, and being nothing more than a home for the ocassional bug or fly. Getting your hopes up every time you see a speck of light dawn on you from the bright kitchen that you see so little of, only to have those hopes crushed when you realize that someone was just looking for the frying pan that got carelessly shoved all up in your personal space in someones careless rush to clean the kitchen. I know. It sucks to be forgotten. It sucks to be unused, especially when you have so much potential. So much to offer.

But Bundt Pan, you shouldn't be so bitter. You see, when you do get used, you really shouldn't do horrible things that make people never want to use you again.

For example...

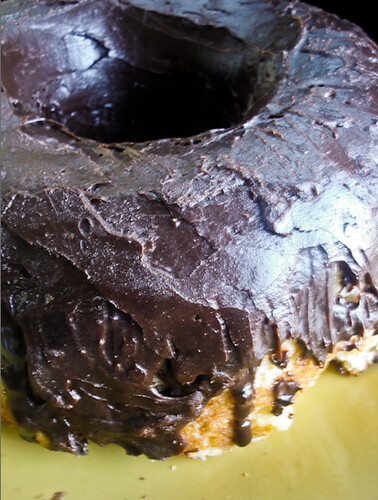
1) Hanging onto half of my cake even though I rubbed shortening all over you 10x.
2) BURNING the top half of my cake regardless of the extra procedures I went through to ensure that didn't happen.
3) Did I mention the hanging onto half of my cake part? Yeah. That wasn't cool, Bundt Pan.

I really do want to use you more. I do. But when you do stuff like this... no matter what I do to avoid it, you always end up throwin' off my groove, Bundt Pan. And it makes me want to never use you. Ever. Ever ever ever ever.

Yellow Cake with Chocolate Ganache


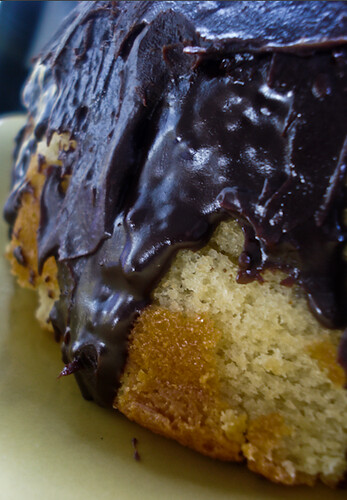
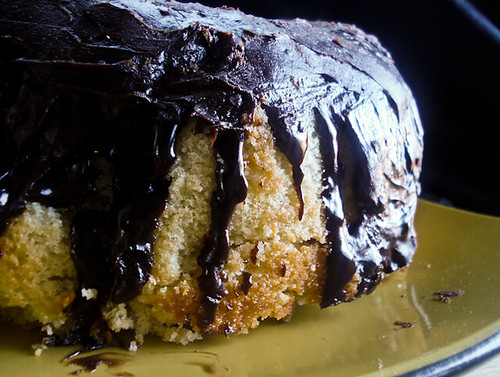
I don't know if I can use you again, Bundt Pan. You really screwed up this time, man. You're lucky I had lots of ganache in the fridgerator. Real lucky. Or else, I might have thrown you out this morning. You're even luckier that this recipe is so kick butt that it's good enough for me to post regardless of your little tactics to try and ruin my cake making desires. Seriously... perfectly, all-american golden cake, tender and moist underneath two thick layers of ganache? Not even you can ruin that, Bundt Pan. Though you try.

I really am serious, man. Maybe if you got your act together, I'd use you more, and then you'd be happier, and so would I. Just sayin'. A little cooperation is all i'm askin' for.

Hopefully, this isn't an omen for the Saints to lose on Sunday. 'Cause if they do... I'm blaming you, Bundt Pan.

With Love,
Your Frusterated Owner Alexandra

Yellow Cake with Chocolate Ganache

Classic American Yellow Cake with Chocolate Ganache
(Adapted from a Passion for Baking by Marcy Goldman)


Note: I highly recommend not using a bundt pan for this recipe like I did, and instead making a layer cake or cupcakes.

INGREDIENTS:

CAKE
1 cup (2 sticks)unsalted butter, softened
1 cup sugar, pulverized in food processor
3 large eggs, room temperature
2 1/2 teaspoons vanilla extract
3 cups all-purpose flour
1/4 teaspoon salt
4 teaspoons baking powder
1 1/2 cups warm milk

GANACHE
1 cup semi-sweet chocolate chips
1 cup heavy cream
1/4 cup butter

DIRECTIONS:

1. Preheat oven to 350F. Generously spray two 9-inch round cakepans with nonstick cooking spray and place pans on large parchment paper-lined baking sheet (or spray 24 cupcake liners).

2. In a mixer bowl or large food processor, blend butter and sugar until fluffy and thoroughly combined. Then add eggs and vanilla and blend well. Add flour, baking powder, and salt, drizzling in milk as mixture blends to make a smooth batter. Spoon batter into prepared cakepans.

3. Bake until cake springs back when gently pressed with fingertips, 35-40 minutes. Cool slightly. Unmold cakes from pans, cool on wire wracks, and then gently wrap in wax paper or plastic wrap. Chill in freezer 30 minutes or wrap and refrigerate until you are ready to frost.

4. To make chocolate ganache, melt in a double boiler or in the microwave the heavy cream, chocolate chips and butter until smooth and velvetty. Cover and place in refrigerator for 30 minutes.

5. To assemble cake, take cake and ganache out. Give the ganache a quick stir to make it velvetty smooth again. Spread 1/4 of the ganache between the cake layers. Spread half of the remaining ganache mixture ontop of the cake, letting it drip down the sides. Return ganache and cake to the refrigerator for 5-10 minutes. Take back out, and give the top of the cake another helping of ganache. Let ganache set on the cake before serving.

Monday, February 1, 2010

Grapefruit Bars

grapefruit bars


I'm pretty sure that south is currently going through a week of PMS. One day, it's rainy and cold. Two days later, it's humid and sunny. Seriously, someone needs to give mother nature some chocolate to help calm her down so she can make up her mind.

It's dreary this Monday. Dreary. Sad. Depressing. Yucky. And while I don't mind the drizzling drops of rain, it does lead to a very slow and dark way to start off the week. And all this chilly weather has been going on long enough to have me pining for summer. I'm missin' the days of beaches and short shorts (although, not so much missing sixty year old guys at the beach in their tighty whities... I can pass on that). I find myself daydreaming about dipping my toes into the pool while enjoying frozen yogurt, or picnics by the lake with my favorite person. It seems like summer will never roll around, and with this constant teasing of off and on sunny/rainy weather, I'm craving the day spring presents itself at my door step.

Until then, though, I will have to make my own spring and summer.

grapefruit bars


I may not be breakin' out my bikini, but you might be tempted to if you're gonna make these grapefruit bars. Yesterday one of the nice ladies at my church brought a ton of citrus fruit that she had picked that weekend with her family. They were fresh, big, juicy, and all they needed was a good wash down and they would be ready for consumption. I'm not gonna lie, I was tempted to grab every single bag of fruit. And I probably would have. But God was watching. ;)

I used to dislike the taste of grapefruit This is probably due to the fact that when I was a kid, I saw my mom drinking it and I asked, "does it taste like orange juice?" She responded, "not really" and then proceeded to tell me she was on a grapefruit diet where all she did was drink and eat grapefruit and she'd lose weight. At the time I thought, "wow, that's dumb, I wouldn't try that"... but after she had left the kitchen and I was looking for something to drink, I decided to pour myself a glass and see what all this magical dietry belief was about. Now, mind you, I was a kid who was accustomed to all things sugar laden regarding fruit juices, so when I took a sip of no-sugar-added grapefruit juice, I promptly puckered up my lips, spit the vile concotion out into the sink and vowed that I would never go on the grapefruit diet and would much rather go on the oreos-and-milk diet. Now a days, though, I don't mind the taste. I think it's pretty good and reminds me a lot of lemon. And so, in hopes of coaxing spring and summer to come faster, I made these awesome grapefruit bars.

And I guess, if you happen to be on the "grapefruit diet", then TECHNICALLY you can eat these, since they have grapefruit in them...

grapefruit bars


But I don't think you'll see very good results. ;)

Grapefruit Bars
(Adapted from Crepes of Wrath)


INGREDIENTS:

1 1/2 cups all-purpose flour + 1/4 cup for filling

1/4 cup white sugar + 1 1/3 cup for filling

1/4 teaspoon kosher salt + 1/2 teaspoon for filling

1/2 cup cold butter, cubed

4 eggs

Zest 3 grapefruits

Juice of 1 grapefruit (about 2/3 cup)

Juice of 1 lemon (about 2/3 cup)

powdered sugar (for dusting)

DIRECTIONS:

1. Preheat the oven to 350 degrees F. In a medium bowl, combine 1 1/2 cups flour and 1/4 teaspoon of salt and set aside.

2. In a mixing bowl, cream together the butter and sugar. Slowly add in the flour and salt mixture until combined.

3. Press this mixture into a greased and/or lined 9×13 pan (I really suggest lining the pan with tin foil and spraying with Pam – this way, you can lift the bars right out of the pan when they’re ready to cut instead of having to angle your knife into a pan). Bake the crust for 15-20 minutes or until just turning golden on the edges.

4. While the crust bakes, combine the grapefruit and lemon zest and 1 1/3 cups of white sugar in a medium sized bowl and rub them together until the zest is incorporated into the sugar (this makes sure that all of the grapefruit and lemon flavor/oils from the zest is well incorporated into the sugar and filling).

5. Whisk or beat in the eggs and add the lemon juice. Add 1/4 cup of flour and 1/2 teaspoon of salt and whisk them in, too.

6. Pour the lemon filling over the hot crust and bake for 20-25 minutes or until the top is set and doesn’t wiggle.

7. Remove the lemon bars from the oven and allow to cool COMPLETELY before sprinkling with powdered sugar and cutting. Makes about 12-16 squares, depending on how large or small you cut them.
 

Dunk Twice Copyright © 2009 Cookiez is Designed by Ipietoon for Free Blogger Template